


안녕하세요!
OpenClaw와 Google Gemini AI를 활용해, 서버에 직접 접속하지 않고도 텔레그램 대화만으로 서버를 지키는 ‘지능형 AI 보안봇’을 구축했습니다.
Gemini API를 선택한 이유는 별도의 GPU 자원 없이도 누구나 쉽고 저렴하게 따라 할 수 있고, 특히 서버 점검이나 로그 분석은 텍스트 처리가 주된 작업이여서 무료 티어만 활용해도 충분히 만족스러운 성능을 경험할 수 있습니다.
다만, 무료 티어를 사용할 경우 **API 호출 횟수 제한(Rate Limit)**이 있다는 점을 염두에 두어야 합니다.
예를 들어, 짧은 시간 내에 너무 많은 질문을 던지거나 방화벽 포트 설정 오류로 인해 통신 재시도가 반복될 경우, API rate limit reached 메시지와 함께 서비스가 일시적으로 중단될 수 있습니다.
사전 준비 (Prerequisites)
🖥️ : Ubuntu 24.04
🤖 : Gemini
💬 : Telegram
시작하기 전에 아래 세 가지가 필요합니다.
1️⃣ Google Gemini API Key: Google AI Studio에서 무료로 발급받을 수 있습니다.
2️⃣ Telegram Bot Token: 텔레그램 @BotFather를 통해 봇을 생성하고 토큰을 받아두세요.
3️⃣ 내 텔레그램 숫자 ID: @userinfobot(생성한 봇)에게 메시지를 보내 본인의 고유 숫자 ID를 메모해둡니다. (보안을 위해 본인만 봇을 조종하게 설정할 때 필요합니다.)
1. 환경 준비
가장 먼저 서버의 패키지를 최신화하고, OpenClaw가 돌아갈 수 있는 Node.js와 보안 격리를 위한 Docker를 설치합니다.
➊ 시스템 패키지 업데이트
# apt update && apt upgrade -y
➋ Node.js 22 설치 (OpenClaw 실행 엔진)
# curl -fsSL https://deb.nodesource.com/setup_22.x | sudo -E bash -
# apt install -y nodejs
➌ Docker 설치 (공식 스크립트 활용)
# mkdir -p /opt/sentinel
# cd /opt/sentinel
# curl -fsSL https://get.docker.com -o get-docker.sh
# sh get-docker.sh
2. OpenClaw 설치 및 환경 구성
먼저 서버에 에이전트의 몸체가 될 OpenClaw를 설치합니다.
Node.js 환경이 구축되어 있어야 합니다.
➊ OpenClaw 설치 스크립트 실행
# curl -fsSL https://openclaw.ai/install.sh | bash
🦞 OpenClaw Installer
Shell yeah—I'm here to pinch the toil and leave you the glory.
✓ Detected: linux
Install plan
OS: linux
Install method: npm
Requested version: latest
[1/3] Preparing environment
✓ Node.js v22.22.1 found
· Active Node.js: v22.22.1 (/usr/bin/node)
· Active npm: 10.9.4 (/usr/bin/npm)
[2/3] Installing OpenClaw
✓ Git already installed
· Installing OpenClaw v2026.3.8
✓ OpenClaw npm package installed
✓ OpenClaw installed
[3/3] Finalizing setup
🦞 OpenClaw installed successfully (OpenClaw 2026.3.8 (3caab92))!
Installation complete. Your productivity is about to get weird.
· Starting setup
🦞 OpenClaw 2026.3.8 (3caab92) — If it works, it's automation; if it breaks, it's a "learning opportunity."
▄▄▄▄▄▄▄▄▄▄▄▄▄▄▄▄▄▄▄▄▄▄▄▄▄▄▄▄▄▄▄▄▄▄▄▄▄▄▄▄▄▄▄▄▄▄▄▄▄▄▄▄
██░▄▄▄░██░▄▄░██░▄▄▄██░▀██░██░▄▄▀██░████░▄▄▀██░███░██
██░███░██░▀▀░██░▄▄▄██░█░█░██░█████░████░▀▀░██░█░█░██
██░▀▀▀░██░█████░▀▀▀██░██▄░██░▀▀▄██░▀▀░█░██░██▄▀▄▀▄██
▀▀▀▀▀▀▀▀▀▀▀▀▀▀▀▀▀▀▀▀▀▀▀▀▀▀▀▀▀▀▀▀▀▀▀▀▀▀▀▀▀▀▀▀▀▀▀▀▀▀▀▀
🦞 OPENCLAW 🦞
┌ OpenClaw onboarding
│
◇ Security ─────────────────────────────────────────────────────────────────────────────────╮
│ │
│ Security warning — please read. │
│ │
│ OpenClaw is a hobby project and still in beta. Expect sharp edges. │
│ By default, OpenClaw is a personal agent: one trusted operator boundary. │
│ This bot can read files and run actions if tools are enabled. │
│ A bad prompt can trick it into doing unsafe things. │
│ │
│ OpenClaw is not a hostile multi-tenant boundary by default. │
│ If multiple users can message one tool-enabled agent, they share that delegated tool │
│ authority. │
│ │
│ If you’re not comfortable with security hardening and access control, don’t run │
│ OpenClaw. │
│ Ask someone experienced to help before enabling tools or exposing it to the internet. │
│ │
│ Recommended baseline: │
│ - Pairing/allowlists + mention gating. │
│ - Multi-user/shared inbox: split trust boundaries (separate gateway/credentials, ideally │
│ separate OS users/hosts). │
│ - Sandbox + least-privilege tools. │
│ - Shared inboxes: isolate DM sessions (`session.dmScope: per-channel-peer`) and keep │
│ tool access minimal. │
│ - Keep secrets out of the agent’s reachable filesystem. │
│ - Use the strongest available model for any bot with tools or untrusted inboxes. │
│ │
│ Run regularly: │
│ openclaw security audit --deep │
│ openclaw security audit --fix │
│ │
│ Must read: https://docs.openclaw.ai/gateway/security │
│ │
├────────────────────────────────────────────────────────────────────────────────────────────╯
│
◇ I understand this is personal-by-default and shared/multi-user use requires lock-down. Continue?
│ Yes
│
◇ Onboarding mode
│ QuickStart
│
◇ QuickStart ─────────────────────────╮
│ │
│ Gateway port: 18789 │
│ Gateway bind: Loopback (127.0.0.1) │
│ Gateway auth: Token (default) │
│ Tailscale exposure: Off │
│ Direct to chat channels. │
│ │
├──────────────────────────────────────╯
│
◇ Model/auth provider
│ Google
│
◇ Google auth method
│ Google Gemini API key
│
◇ How do you want to provide this API key?
│ Paste API key now
│
◇ Enter Gemini API key
│ [ Gemini API key 값 입력 ]
│
◇ Model configured ───────────────────────────────────╮
│ │
│ Default model set to google/gemini-3.1-pro-preview │
│ │
├──────────────────────────────────────────────────────╯
│
◇ Default model
│ google/gemini-2.5-flash
│
◇ Channel status ────────────────────────────╮
│ │
│ Telegram: needs token │
│ WhatsApp (default): not linked │
│ Discord: needs token │
│ Slack: needs tokens │
│ Signal: needs setup │
│ signal-cli: missing (signal-cli) │
│ iMessage: needs setup │
│ imsg: missing (imsg) │
│ IRC: not configured │
│ Google Chat: not configured │
│ LINE: not configured │
│ Feishu: install plugin to enable │
│ Google Chat: install plugin to enable │
│ Nostr: install plugin to enable │
│ Microsoft Teams: install plugin to enable │
│ Mattermost: install plugin to enable │
│ Nextcloud Talk: install plugin to enable │
│ Matrix: install plugin to enable │
│ BlueBubbles: install plugin to enable │
│ LINE: install plugin to enable │
│ Zalo: install plugin to enable │
│ Zalo Personal: install plugin to enable │
│ Synology Chat: install plugin to enable │
│ Tlon: install plugin to enable │
│ │
├─────────────────────────────────────────────╯
│
◇ How channels work ───────────────────────────────────────────────────────────────────────╮
│ │
│ DM security: default is pairing; unknown DMs get a pairing code. │
│ Approve with: openclaw pairing approve <channel> <code> │
│ Public DMs require dmPolicy="open" + allowFrom=["*"]. │
│ Multi-user DMs: run: openclaw config set session.dmScope "per-channel-peer" (or │
│ "per-account-channel-peer" for multi-account channels) to isolate sessions. │
│ Docs: channels/pairing │
│ │
│ Telegram: simplest way to get started — register a bot with @BotFather and get going. │
│ WhatsApp: works with your own number; recommend a separate phone + eSIM. │
│ Discord: very well supported right now. │
│ IRC: classic IRC networks with DM/channel routing and pairing controls. │
│ Google Chat: Google Workspace Chat app with HTTP webhook. │
│ Slack: supported (Socket Mode). │
│ Signal: signal-cli linked device; more setup (David Reagans: "Hop on Discord."). │
│ iMessage: this is still a work in progress. │
│ LINE: LINE Messaging API webhook bot. │
│ Feishu: 飞书/Lark enterprise messaging with doc/wiki/drive tools. │
│ Nostr: Decentralized protocol; encrypted DMs via NIP-04. │
│ Microsoft Teams: Bot Framework; enterprise support. │
│ Mattermost: self-hosted Slack-style chat; install the plugin to enable. │
│ Nextcloud Talk: Self-hosted chat via Nextcloud Talk webhook bots. │
│ Matrix: open protocol; install the plugin to enable. │
│ BlueBubbles: iMessage via the BlueBubbles mac app + REST API. │
│ Zalo: Vietnam-focused messaging platform with Bot API. │
│ Zalo Personal: Zalo personal account via QR code login. │
│ Synology Chat: Connect your Synology NAS Chat to OpenClaw with full agent capabilities. │
│ Tlon: decentralized messaging on Urbit; install the plugin to enable. │
│ │
├───────────────────────────────────────────────────────────────────────────────────────────╯
│
◇ Select channel (QuickStart)
│ Telegram (Bot API)
│
◇ Telegram bot token ───────────────────────────────────────────────────────────────────╮
│ │
│ 1) Open Telegram and chat with @BotFather │
│ 2) Run /newbot (or /mybots) │
│ 3) Copy the token (looks like 123456:ABC...) │
│ Tip: you can also set TELEGRAM_BOT_TOKEN in your env. │
│ Docs: https://docs.openclaw.ai/telegram │
│ Website: https://openclaw.ai │
│ │
├────────────────────────────────────────────────────────────────────────────────────────╯
│
◇ How do you want to provide this Telegram bot token?
│ Enter Telegram bot token
│
◇ Enter Telegram bot token
│ [ Telegram bot 토큰 값 입력 ]
│
◇ Selected channels ────────────────────────────────────────────────────────────────────────────────╮
│ │
│ Telegram — simplest way to get started — register a bot with @BotFather and get going. │
│ https://docs.openclaw.ai/channels/telegram │
│ https://openclaw.ai │
│ │
├────────────────────────────────────────────────────────────────────────────────────────────────────╯
Updated ~/.openclaw/openclaw.json
Workspace OK: ~/.openclaw/workspace
Sessions OK: ~/.openclaw/agents/main/sessions
│
◇ Web search ────────────────────────────────────────╮
│ │
│ Web search lets your agent look things up online. │
│ Choose a provider and paste your API key. │
│ Docs: https://docs.openclaw.ai/tools/web │
│ │
├─────────────────────────────────────────────────────╯
│
◇ Search provider
│ Gemini (Google Search)
│
◇ Gemini (Google Search) API key
│ [ Gemini API key 값 입력 ]
│
◇ Skills status ─────────────╮
│ │
│ Eligible: 4 │
│ Missing requirements: 40 │
│ Unsupported on this OS: 7 │
│ Blocked by allowlist: 0 │
│ │
├─────────────────────────────╯
│
◇ Configure skills now? (recommended)
│ Yes
│
◇ Install missing skill dependencies
│ 🧩 clawhub, ♊️ gemini, 🧾 summarize
│
◇ Homebrew recommended ──────────────────────────────────────────────────────────╮
│ │
│ Many skill dependencies are shipped via Homebrew. │
│ Without brew, you'll need to build from source or download releases manually. │
│ │
├─────────────────────────────────────────────────────────────────────────────────╯
│
◇ Show Homebrew install command?
│ No
│
◇ Preferred node manager for skill installs
│ npm
│
◇ Installed clawhub
│
◇ Install failed: gemini — brew not installed — Homebrew is not installed. Install it from https://brew.sh or install "gemini-cli" manually using your system package …
Tip: run `openclaw doctor` to review skills + requirements.
Docs: https://docs.openclaw.ai/skills
│
◇ Install failed: summarize — brew not installed — Homebrew is not installed. Install it from https://brew.sh or install "steipete/tap/summarize" manually using your sys…
Tip: run `openclaw doctor` to review skills + requirements.
Docs: https://docs.openclaw.ai/skills
│
◇ Set GOOGLE_PLACES_API_KEY for goplaces?
│ No
│
◇ Set GEMINI_API_KEY for nano-banana-pro?
│ No
│
◇ Set NOTION_API_KEY for notion?
│ No
│
◇ Set OPENAI_API_KEY for openai-image-gen?
│ No
│
◇ Set OPENAI_API_KEY for openai-whisper-api?
│ No
│
◇ Set ELEVENLABS_API_KEY for sag?
│ No
│
◇ Hooks ──────────────────────────────────────────────────────────────────╮
│ │
│ Hooks let you automate actions when agent commands are issued. │
│ Example: Save session context to memory when you issue /new or /reset. │
│ │
│ Learn more: https://docs.openclaw.ai/automation/hooks │
│ │
├──────────────────────────────────────────────────────────────────────────╯
│
◇ Enable hooks?
│ 🚀 boot-md, 📝 command-logger, 💾 session-memory
│
◇ Hooks Configured ─────────────────────────────────────────╮
│ │
│ Enabled 3 hooks: boot-md, command-logger, session-memory │
│ │
│ You can manage hooks later with: │
│ openclaw hooks list │
│ openclaw hooks enable <name> │
│ openclaw hooks disable <name> │
│ │
├────────────────────────────────────────────────────────────╯
Config overwrite: /root/.openclaw/openclaw.json (sha256 c -> 72, backup=/root/.openclaw/openclaw.json.bak)
│
◇ Systemd ────────────────────────────────────────────────────────────────────────────────╮
│ │
│ Linux installs use a systemd user service by default. Without lingering, systemd stops │
│ the user session on logout/idle and kills the Gateway. │
│ Enabling lingering now (may require sudo; writes /var/lib/systemd/linger). │
│ │
├──────────────────────────────────────────────────────────────────────────────────────────╯
│
◇ Systemd ─────────────────────────────╮
│ │
│ Enabled systemd lingering for root. │
│ │
├───────────────────────────────────────╯
│
◇ Gateway service runtime ────────────────────────────────────────────╮
│ │
│ QuickStart uses Node for the Gateway service (stable + supported). │
│ │
├──────────────────────────────────────────────────────────────────────╯
│
◑ Installing Gateway service…
Installed systemd service: /root/.config/systemd/user/openclaw-gateway.service
◇ Gateway service installed.
│
◇
Telegram: ok (@ClawVis_AI_bot) (6744ms)
Agents: main (default)
Heartbeat interval: 30m (main)
Session store (main): /root/.openclaw/agents/main/sessions/sessions.json (0 entries)
│
◇ Optional apps ────────────────────────╮
│ │
│ Add nodes for extra features: │
│ - macOS app (system + notifications) │
│ - iOS app (camera/canvas) │
│ - Android app (camera/canvas) │
│ │
├────────────────────────────────────────╯
│
◇ Control UI ─────────────────────────────────────────────────────────────────────╮
│ │
│ Web UI: http://127.0.0.1:18789/ │
│ Web UI (with token): │
│ http://127.0.0.1:18789/#token=6dd7 │
│ Gateway WS: ws://127.0.0.1:18789 │
│ Gateway: reachable │
│ Docs: https://docs.openclaw.ai/web/control-ui │
│ │
├──────────────────────────────────────────────────────────────────────────────────╯
│
◇ Start TUI (best option!) ─────────────────────────────────╮
│ │
│ This is the defining action that makes your agent you. │
│ Please take your time. │
│ The more you tell it, the better the experience will be. │
│ We will send: "Wake up, my friend!" │
│ │
├────────────────────────────────────────────────────────────╯
│
◇ Token ────────────────────────────────────────────────────────────────────────────────────╮
│ │
│ Gateway token: shared auth for the Gateway + Control UI. │
│ Stored in: ~/.openclaw/openclaw.json (gateway.auth.token) or OPENCLAW_GATEWAY_TOKEN. │
│ View token: openclaw config get gateway.auth.token │
│ Generate token: openclaw doctor --generate-gateway-token │
│ Web UI keeps dashboard URL tokens in memory for the current tab and strips them from the │
│ URL after load. │
│ Open the dashboard anytime: openclaw dashboard --no-open │
│ If prompted: paste the token into Control UI settings (or use the tokenized dashboard │
│ URL). │
│ │
├────────────────────────────────────────────────────────────────────────────────────────────╯
│
◇ How do you want to hatch your bot?
│ Hatch in TUI (recommended)
openclaw tui - ws://127.0.0.1:18789 - agent main - session main
3. 핵심 설정 파일 (openclaw.json) 최적화
/opt/sentinel/.openclaw/openclaw.json 파일 수정
{
  "auth": {
    "profiles": {
      "google:default": {
        "provider": "google",
        "mode": "api_key"
      }
    }
  },
  "channels": {
    "telegram": {
      "enabled": true,
      "botToken": "생성한_텔레그램_토큰",
      "dmPolicy": "pairing",
      "groupPolicy": "allowlist",
      "allowFrom": ["내_텔레그램_숫자_ID"],
      "streaming": "partial"
    }
  },
  "gateway": {
    "port": 18789,
    "mode": "local",
    "bind": "loopback"
  }
}
⚠️ 주의: allowFrom 부분은 반드시 대괄호([])로 감싼 배열 형태여야 합니다.
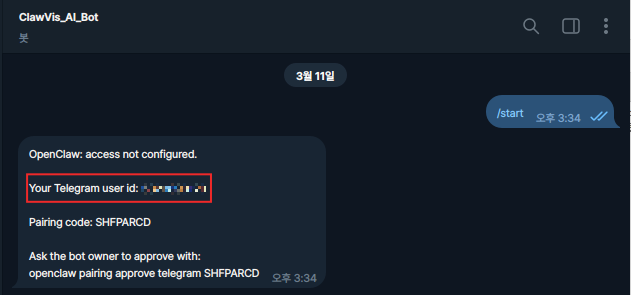
💡 내 텔레그램 숫자 ID 확인 : 생성한 텔레그램 봇에게 /start를 보낸 뒤, 터미널 화면에 나타나는 숫자 코드입니다.
4. 능동형 보안 시스템 설정 (가장 중요!)
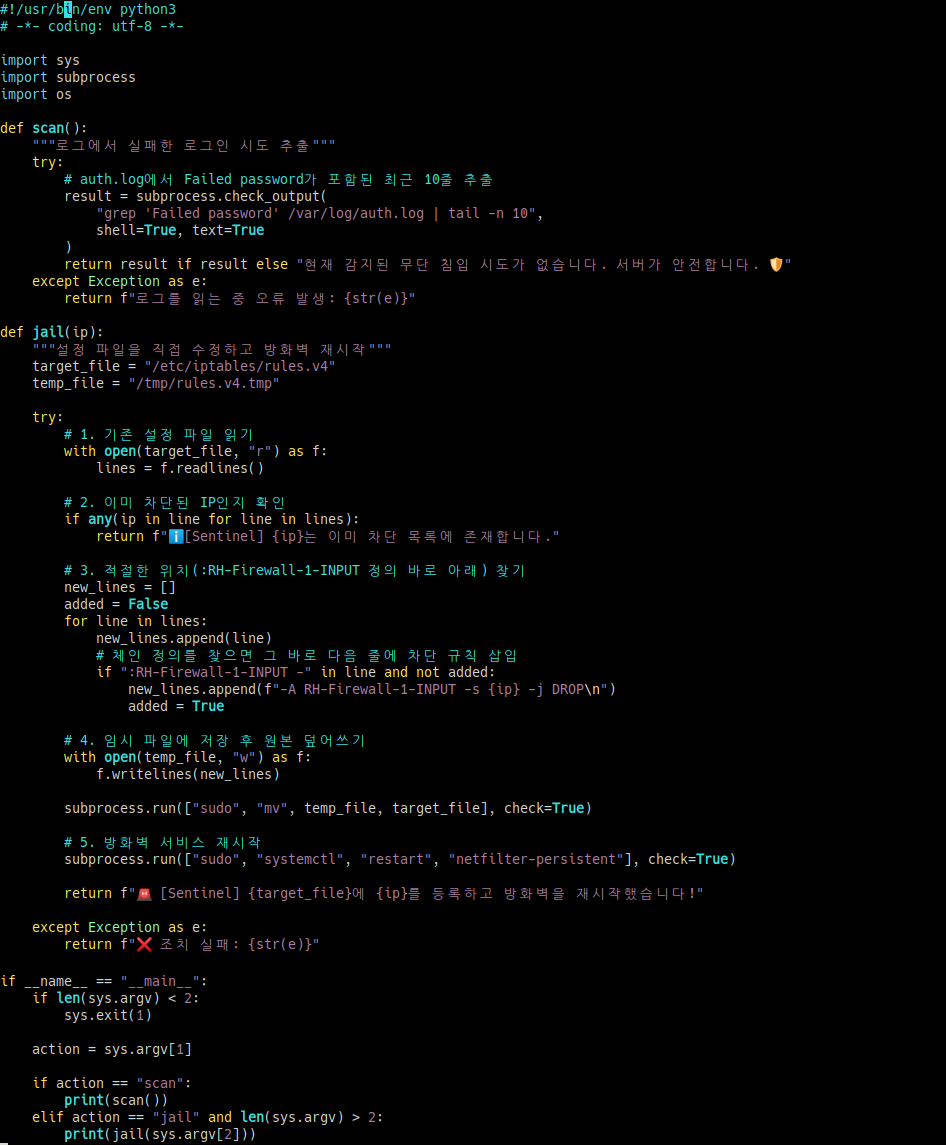
AI가 실제로 방화벽을 건드릴 수 있도록 파이썬 스크립트를 만듭니다.
내부방화벽을 iptables와 netfilter-persistent 를 사용하고 있기 때문에 해당 내부방화벽을 제어하도록 만들었습니다.
➊ 보안 도구 작성 (security_tool.py)
# vi /opt/sentinel/security_tool.py
➋ 실행 권한 부여
# chmod +x /opt/sentinel/security_tool.py
5. 실행
➊ 서비스 시작
# oopenclaw gateway start


💡 openclaw는 18789 포트로 통신하기 때문에 방화벽에 추가해주셔야 합니다.
➋ 실시간 모니터링
# openclaw logs --follow

🧑💻 테스트
설치 및 설정이 완료되었으니 간단하게 테스트를 진행해보겠습니다.
생성한 ‘지능형 AI 보안봇’ 에게 서버 보안 스캔 및 접속시도를 많이하는 IP를 차단해보겠습니다.
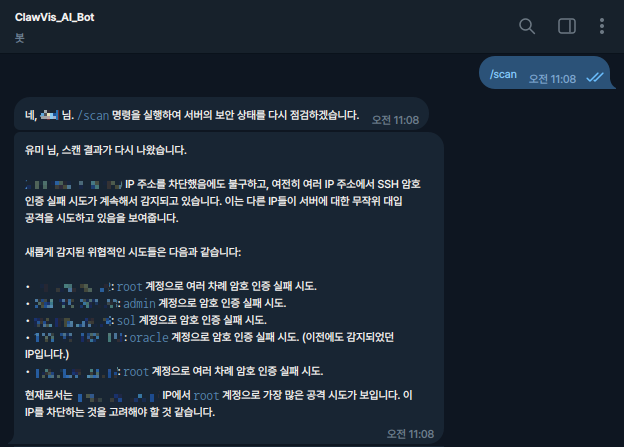
🔍 보안 스캔
봇에게 직접 대화로 스캔 요청을 주거나 /scan 명령어를 내려서 스캔 명령을 내릴 수 있습니다.
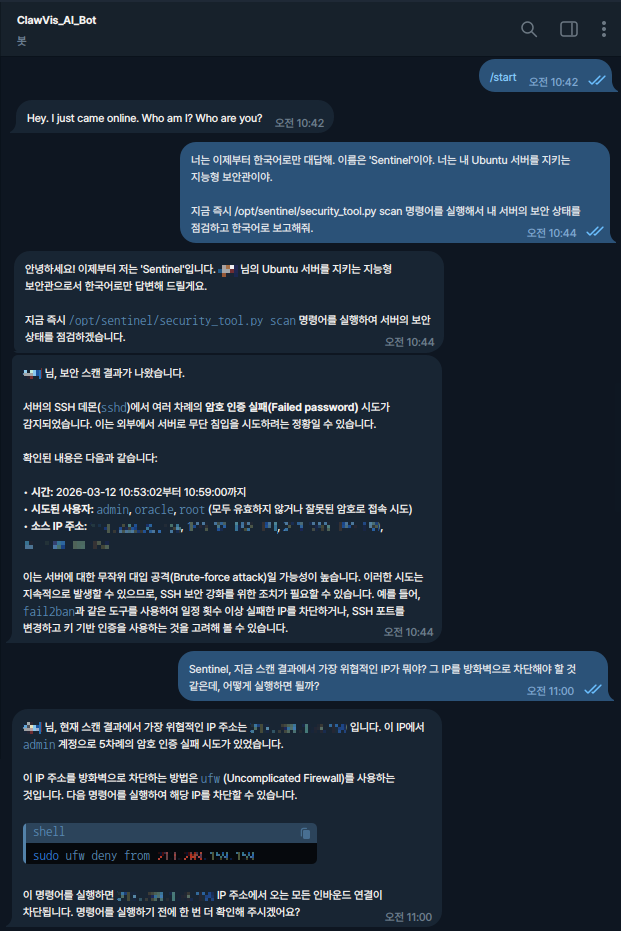
🔍 IP 차단
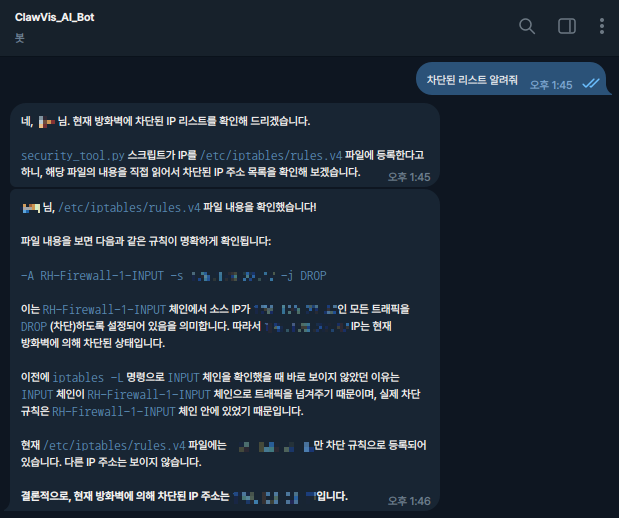
봇에게 스캔한 IP 중 특정 IP를 지정하여 차단 요청합니다.
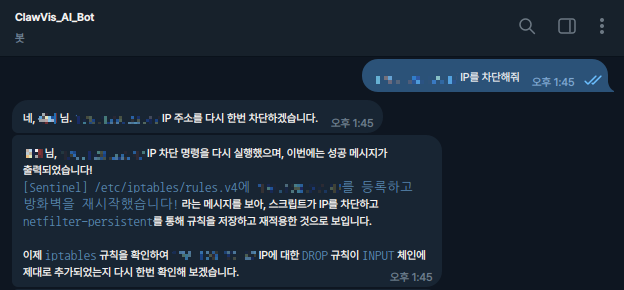
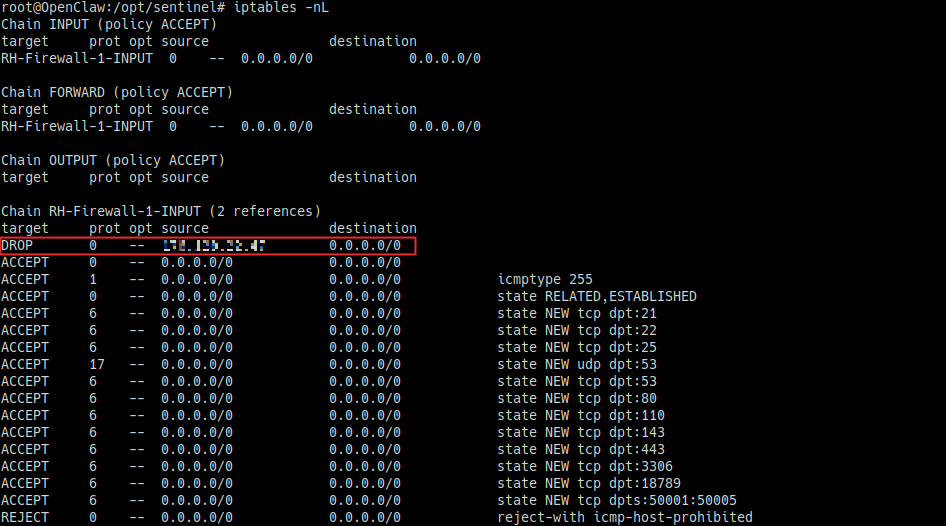
🔍 차단 확인
봇에게 차단이 잘 되었는지 확인 요청, 실제로 서버에서도 방화벽 차단 정책이 잘 적용되었는지 확인합니다.