안녕하세요, 오늘은 라라벨에서 php artisan migrate 실행시 뜨는 오류들 중에서 Access denied for user ‘root’@’localhost’ 에러 해결법에 대해서 확인해보겠습니다.
1. 에러메시지
콘솔창에서 php artisan migrate 명령어를 입력하게 되면, 다음과 같은 에러메시지가 발생합니다.
 Illuminate\Database\QueryException

SQLSTATE[HY000] [1698] Access denied for user 'root'@'localhost' (SQL: select * from information_schema.tables where table_schema = laravel and table_name = migrations and table_type = 'BASE TABLE')

at vendor/laravel/framework/src/Illuminate/Database/Connection.php:760
  756▕         // If an exception occurs when attempting to run a query, we'll format the error
  757▕         // message to include the bindings with SQL, which will make this exception a
  758▕         // lot more helpful to the developer instead of just the database's errors.
  759▕         catch (Exception $e) {
➜ 760▕             throw new QueryException(
  761▕                 $query, $this->prepareBindings($bindings), $e
  762▕             );
  763▕         }
  764▕     }

    +36 vendor frames
37  artisan:35
    Illuminate\Foundation\Console\Kernel::handle()
cmd창에서 진행한 결과이기 때문에 사람마다, 설정마다 다 다를 수 있으며, Access denied for user ‘root’@’localhost’ 오류가 발생했다면 다음과 같은 해결법을 사용해볼 수 있습니다.
2. 해결법
해결법 요약
- mysql 비밀번호 설정
- 라라벨 프로젝트 이름에 맞는 데이터베이스 생성 > systemctl restart mysql
- php artisan config:cache, php artisan config:clear, php artisan 캐시:clear > php artisan migrate
해결법 설명
SQLSTATE[HY000] [1045] Access denied for user ‘root’@’localhost’ (using password: NO),
SQLSTATE[HY000] [1698] Access denied for user ‘root’@’localhost’
두 오류 전부 mysql 비밀번호 관련한 오류이기 때문에 동일하게 진행합니다.
- mysql 비밀번호 자체를 설정한 적이 없음
- .env 파일에서 mysql 비밀번호를 입력하지 않음
이 두 문제로 나눠서 설명드릴 수 있습니다.
첫 번째 원인은 간단한 mysql 명령문으로 해결할 수 있습니다.
mysql -u root -p로 접근한 뒤, 비밀번호를 치거나 엔터를 누른 후, 다음과 같은 명령문을 입력해줍니다.
ALTER user 'root'@'localhost' IDENTIFIED WITH mysql_native_password BY '변경 비밀번호';
그리고 생성한 프로젝트명으로 된 데이터베이스도 만들어줍니다.
create database '프로젝트명';
이후 exit한 다음, systemctl restart mysql을 통해 mysql을 재시작해줍니다.
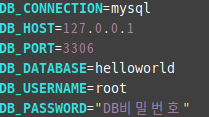
그 후, .env 파일에서 mysql 비밀번호를 입력하면 됩니다. (.env 파일은 라라벨의 환경설정 파일입니다 중요한 정보기 때문에 git이나 VCS에 push하지 않습니다)

DB_PASSWORD 제외, 다른 정보는 DB 관련 정보는 “laravel new 프로젝트명” 명령어나 “composer create-project laravel/laravel 프로젝트명” 명령어를 통해 자동으로 입력됩니다.
laravel new 명령어를 통해 프로젝트를 생성할 경우, 아래 이미지처럼 migrations 관련해서 yes를 선택하게 된다면 Access denied for user ‘root’@’localhost’ 오류가 날 수 있으니 조심해주세요.

php artisan config:cache
php artisan config:clear
php artisan cache:clear
php artisan migrate
이 순서대로 콘솔창에 명령어 입력해주시면 끝납니다. (위 명령어에 대해 자세한 설명이 궁금하시다면 아래를 참고해주세요.)
명령어 설명
php artisan config:cache : 환경 설정을 캐싱하는 명령어입니다. 환경 설정 파일(.env) 수정 후에는 이 명령어를 실행해야 합니다. 그렇지 않으면 변경된 설정이 반영되지 않습니다.
php artisan config:clear : 캐싱된 설정파일을 삭제하여 설정 파일을 다시 읽어들입니다. 변경 사항이 반영되지 않을 때 이 명령어를 실행해주세요.
php artisan cache:clear : 모든 캐시를 비웁니다. 캐시에 저장된 데이터가 오래되거나 부정확하다면 실행해주세요.
php artisan migrate : 데이터베이스 마이그레이션을 진행하여 데이터베이스 스키마를 구성합니다.


