


안녕하세요 . 이번 글에서는 openclaw 서버 관리 방법을 알아보겠습니다.
이전글 에서 opencalw +telegram 설치는 해보았구요.
이번엔 telegram 또는 Web을 이용하여 다른 원격서버를 모니터링하고 명령어를 내려보겠습니다.
1openclaw 서버 관리를 위한 nginx 설치
nginx는 openclaw를 웹사이트를 연결해줄 용도로 사용합니다.
sudo apt update
sudo apt install nginx -y
sudo systemctl enable nginx
sudo systemctl start nginx
1)nginx 설정 및 ssl 인증서 적용
mydomain은 항상 본인 도메인으로 변경 해주셔합니다.
vi /etc/nginx/sites-available/openclaw

server {
    listen 80;
    server_name mydomain.com;

    location / {
        proxy_pass http://127.0.0.1:18789;  # OpenClaw 포트
        proxy_http_version 1.1;
        proxy_set_header Upgrade $http_upgrade;
        proxy_set_header Connection 'upgrade';
        proxy_set_header Host $host;
        proxy_set_header X-Real-IP $remote_addr;
        proxy_set_header X-Forwarded-For $proxy_add_x_forwarded_for;
        proxy_cache_bypass $http_upgrade;
    }
}


sudo ln -s /etc/nginx/sites-available/openclaw /etc/nginx/sites-enabled/
nginx -t
nginx: the configuration file /etc/nginx/nginx.conf syntax is ok
nginx: configuration file /etc/nginx/nginx.conf test is successful


sudo systemctl reload nginx
sudo apt install certbot python3-certbot-nginx -y
sudo certbot --nginx -d mydomain.com
본인 메일 치고 -> Y -> N 하면
Successfully received certificate 이렇게 나옵니다.
완료가 되면 다시 nginx 설정 파일에 특정 아이피만 접근 가능하게 변경합니다.
cat /etc/nginx/sites-available/openclaw

server {
    server_name mydomain.com;

    allow ***.***.***.***;
    deny all;

    location / {
        proxy_pass http://127.0.0.1:18789;  # OpenClaw 포트
        proxy_http_version 1.1;
        proxy_set_header Upgrade $http_upgrade;
        proxy_set_header Connection 'upgrade';
        proxy_set_header Host $host;
        proxy_set_header X-Real-IP $remote_addr;
        proxy_set_header X-Forwarded-For $proxy_add_x_forwarded_for;
        proxy_cache_bypass $http_upgrade;
    }

    listen 443 ssl; # managed by Certbot
    ssl_certificate /etc/letsencrypt/live/mydomain.com/fullchain.pem; # managed by Certbot
    ssl_certificate_key /etc/letsencrypt/live/mydomain.com/privkey.pem; # managed by Certbot
    include /etc/letsencrypt/options-ssl-nginx.conf; # managed by Certbot
    ssl_dhparam /etc/letsencrypt/ssl-dhparams.pem; # managed by Certbot

}
server {
    if ($host = mydomain.com) {
        return 301 https://$host$request_uri;
    } # managed by Certbot


    listen 80;
    server_name mydomain.com;
    return 404; # managed by Certbot


}
openclaw설치는 이전 게시글을 확인해주세요
2.Openclaw 설치 및 설정
nginx와 Openclaw 를 연결하는 설정으로는
allowedOrigins 설정에 내도메인을 넣어주어야합니다.
~/.openclaw/openclaw.json

"gateway": {
"port": 18789,
"mode": "local",
"bind": "lan",
"trustedProxies": ["127.0.0.1"],
"controlUi": {
"allowedOrigins": [
"https://mydomain.com"


systemctl restart openclaw
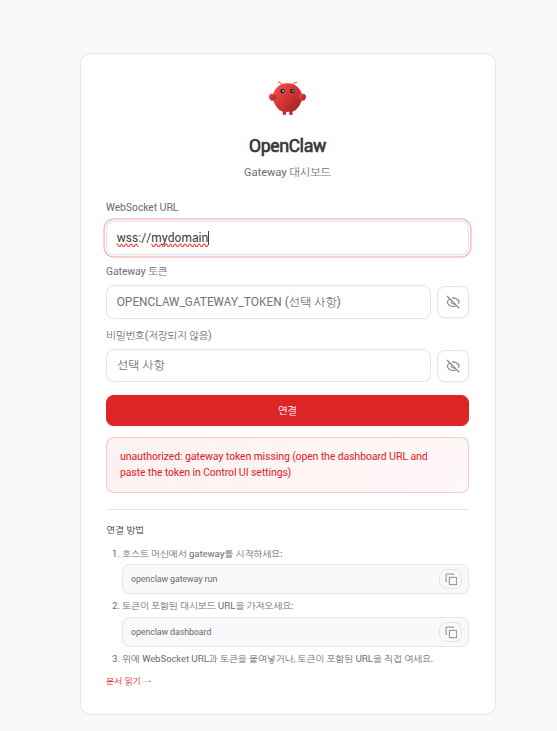
이제 연결한 도메인으로 들어갑니다.
이렇게 나온다면 ~/.openclaw/openclaw.json 파일에 auth 에 token값을 가져와서 넣으시면 연결됩니다.

몇 달 전에 했을 때 보다 웹 환경이 많이 개선 된 거 같습니다. 깔끔하고 한국어 지원도 잘되네요 .
이제 ssh key를 등록하여 대상 서버들을 어떻게 컨트롤하는지 보겠습니다.
우선 openclaw서버에서 ssh key 를 만들고 진행하겠습니다.
1)openclaw 서버 관리 SSH키 생성 및 등록
# ssh-keygen -t rsa -b 4096 -f ~/.ssh/id_rsa -N ""
Generating public/private rsa key pair.
...
+---[RSA 4096]----+
|           .*@@%B|
|         ..o++OO+|
|        . o+oo=+ |
|       . ..=.  ..|
|        S . E.  .|
|         o  .o.  |
|          . o..+ |
|           . .+oo|
|              .o.|
+----[SHA256]-----+


1번 서버
 ssh-copy-id -i ~/.ssh/id_rsa.pub root@***.***.***.***
 1번서버 패스워드
2번 서버
 ssh-copy-id -i ~/.ssh/id_rsa.pub root@***.***.***.***
 2번서버 패스워드
3번 서버
 ssh-copy-id -i ~/.ssh/id_rsa.pub root@***.***.***.***
 3번서버 패스워드

하고 1,2,3번 서버에 패스워드없이 접근이 되는지 확인하면됩니다.
2) openclaw 서버 관리 TOOLS.md 설정
Openclaw는 tool , skill 등을 미리 등록하여 해당 정보를 미리 넣어주고 예제 및 주의점을 미리 넣어두면 사용이 보다 쉽고 빠릅니다.
cat ~/.openclaw/workspace/TOOLS.md
# TOOLS.md - Local Notes

## SSH Servers (Infrastructure)

| Alias | IP | OS | Description |
|-------|----|----|-------------|
| server1 | ***.***.***.*** | Linux |  Server 1 |
| server2 | ***.***.***.*** | Linux |  Server 2 |
| server3 | ***.***.***.*** | Linux |  Server 3 |

- SSH User: root
- SSH Key: ~/.ssh/id_rsa (no password)
- Connect: ssh -o StrictHostKeyChecking=no -o ConnectTimeout=10 root@[IP] "[command]"

### Usage Examples
- "server1 CPU 확인" → ssh root@***.***.***.*** "top -bn1 | grep Cpu"
- "server2 메모리 확인" → ssh root@***.***.***.*** "free -h"
- "server3 디스크 확인" → ssh root@***.***.***.*** "df -h"
- "전체 서버 상태" → run on all 3 servers and summarize
- "server1 nginx 재시작" → ssh root@***.***.***.*** "systemctl restart nginx"
- "server1 로그 확인" → ssh root@***.***.***.*** "journalctl -n 50 --no-pager"

### Rules
- Always confirm before: reboot, shutdown, rm -rf
- Show output in Korean summary
- If all servers requested, run on all 3 and aggregate results

openclaw gateway restart
재시작이 완료되면 이제 어떻게 작동하는지 보겠습니다.
3.Openclaw 모니터링 및 서버관리
1) 모니터링 [CPU,Memory]

2) 명령어 전달 [Disk_Mount]


2) 설치 및 설정 [nginx 설치 및 도메인 설정]


설정이 매우 잘되네요. 이상 한대의 openclaw서버로 다른 서버들을 설정하는 과정 이였습니다.
이 글은 본인의 실제 경험과 학습을 기반으로 직접 작성하였으며, AI는 참고용으로만 활용하였습니다.