






 김 민혁
1. 실습 개요
1-1. 실습 목적
NGINX2Root 취약점의 영향 조건을 확인하고, NGINX 1.31.8 소스 코드에 NGINX 1.31.9의 변경사항을 적용한 후 재빌드하여 실행하는 과정을 실습한다.
전체 작업은 다음 순서로 진행한다.
- NGINX2Root 취약점 개요 확인
- 패치 적용 전 취약점 노출 조건 점검
- 기존 NGINX 소스 코드 백업
- NGINX 1.31.8과 1.31.9의 변경사항 추출
- 패치 파일 사전 검사 및 적용
- 소스 코드 변경 여부 확인
- configure 및 make를 통한 재빌드
- make install을 통한 설치
- NGINX 설정 및 실행 상태 확인
- HTTP/2 통신 검증
1-2. 실습 환경
| 구분 | 내용 |
|---|---|
| OS | Ubuntu 22.04.5 |
| 테스트 서버 | HYUKtest |
| 기존 NGINX 소스 | 1.31.8 |
| 패치 기준 소스 | 1.31.9 |
| Git 저장소 | /usr/local/src/nginx-upstream |
| 기존 소스 경로 | /opt/nginx-lab/src/nginx-1.31.8 |
| 기존 소스 백업 | /opt/nginx-lab/src/nginx-1.31.8.before-patch |
| 패치 파일 | /opt/nginx-lab/src/nginx-1.31.9-security.patch |
| 설치 경로 | /opt/nginx-lab/versions/nginx-1.31.8-patched |
| HTTPS 포트 | 18443 |
2. NGINX2Root 취약점 개요
2-1. 취약점 설명
2026년 11월 18일 공개된 NGINX2Root는 NGINX에서 발견된 다섯 가지 원격 코드 실행 취약점을 묶어 부르는 명칭이다.
대표 취약점인 CVE-2026-123007은 HTTP/2의 Flow Control 처리 과정에서 발생하는 메모리 손상 취약점이다.
HTTP/2 연결에서 전송 윈도우를 처리하는 과정의 정수 오버플로 및 메모리 경계 검사 문제가 원인이며, 이를 악용하면 NGINX Worker Process의 권한으로 원격 코드 실행이 가능하다.
여기서 주의할 점은 NGINX 취약점 자체의 RCE와 Linux 커널 취약점을 통한 권한 상승은 별개의 단계라는 것이다.
- NGINX 취약점: NGINX Worker Process 권한으로 코드 실행
- Linux 커널 SCTP 취약점: 별도의 커널 취약점을 이용한 권한 상승
- 두 취약점을 연계한 공격: 호스트의 root 권한까지 확대 가능
따라서 NGINX 취약점 하나만으로 곧바로 root 권한을 획득한다고 설명해서는 안 된다.
2-2. NGINX2Root 관련 취약점
| CVE | 취약점 내용 | 주요 영향 조건 |
|---|---|---|
| CVE-2026-123007 | HTTP/2 Flow Control 메모리 손상 | HTTP/2 활성화 |
| CVE-2026-123634 | Resolver 처리 중 Use-After-Free | 특정 resolver 및 proxy_pass, mirror 구성 |
| CVE-2026-123633 | HTTP/2 연결 처리 중 Use-After-Free | HTTP/2 및 upstream 전달 구성 |
| CVE-2026-121810 | HTTP/3 연결 처리 중 Use-After-Free | HTTP/3/QUIC 및 upstream 구성 |
| CVE-2026-113425 | Mail Proxy 처리 중 Use-After-Free | mail proxy 및 auth_http 구성 |
각 취약점은 서로 다른 모듈과 설정 조건을 요구한다.
따라서 NGINX 버전만 확인하는 것이 아니라 실제 사용 중인 모듈과 설정도 함께 점검해야 한다.
2-3. 영향 버전 및 패치 버전
NGINX 공식 보안 권고에서 안내하는 주요 수정 버전은 다음과 같다.
| 구분 | 수정 버전 |
|---|---|
| NGINX Mainline | 1.31.9 |
| NGINX Stable | 1.30.7 |
이번 실습에서는 Mainline 버전인 1.31.8과 1.31.9를 비교하여 변경사항을 적용한다.
2-4. HTTP/2 비활성화에 대한 주의사항
HTTP/2를 비활성화하면 CVE-2026-123007 및 CVE-2026-123633에 대한 임시 완화책이 될 수 있다.
그러나 HTTP/3, Resolver, Mail Proxy 관련 취약점까지 해결하는 것은 아니다.
따라서 HTTP/2 비활성화만으로 NGINX2Root 전체에 대한 조치가 완료되었다고 판단해서는 안 된다.
3. 패치 적용 전 취약점 노출 조건 점검
본격적인 소스 코드 패치에 앞서 NGINX가 취약점의 주요 노출 조건에 해당하는지 확인한다.
이번 절차는 Xint에서 제시한 노출 검사 항목을 기준으로 작성한다.
3-1. NGINX 버전 확인
# /opt/nginx-lab/versions/nginx-1.31.8-patched/sbin/nginx -v
확인 예시:
nginx version: nginx/1.31.8
CVE-2026-123007의 영향 버전 범위에 포함되는지 확인한다.
3-2. HTTP/2 모듈 컴파일 여부 확인
# /opt/nginx-lab/versions/nginx-1.31.8-patched/sbin/nginx -V 2>&1 \
    | grep -o -- '--with-http_v2_module'
확인 예시:
--with-http_v2_module
해당 옵션이 출력되면 NGINX 빌드 시 HTTP/2 모듈이 포함된 것이다.
3-3. 실행 설정에서 HTTP/2 활성화 여부 확인
# /opt/nginx-lab/versions/nginx-1.31.8-patched/sbin/nginx -T 2>&1 \
    | grep -nE 'listen[^;]*http2|http2[[:space:]]+on'
> 실습 설정:
server {
    listen 18443 ssl;
    http2 on;
    server_name localhost;
}
> 확인 결과:
14: http2 on;
실행 중인 NGINX가 사용하는 설정에서 HTTP/2가 활성화되어 있는지 확인한다.
3-4. 외부에서 HTTP/2 연결 가능 여부 확인
NGINX 서버가 아닌 외부 서버에서 다음 명령어를 실행한다.
# openssl s_client \
    -connect 서버IP:18443 \
    -servername 서비스도메인 \
    -alpn h2 </dev/null 2>&1 \
    | grep -i 'ALPN protocol'
정상적으로 HTTP/2가 협상되면 다음과 같이 출력된다.
ALPN protocol: h2
이 결과는 외부 클라이언트와 NGINX 사이에서 HTTP/2 연결이 협상되었음을 의미한다.
※ 이번 실습에서 제공된 결과에는 외부 서버에서 실행한 ALPN 검사 출력이 없으므로 해당 항목은 별도 확인이 필요하다.
3-5. 사전 점검 결과
| 점검 항목 | 확인 결과 |
|---|---|
| NGINX 버전 | 1.31.8 |
| HTTP/2 모듈 | --with-http_v2_module 포함 |
| HTTP/2 설정 | http2 on; 활성화 |
| 로컬 HTTP/2 통신 | HTTP/2 200 확인 |
| 외부 HTTP/2 연결 | 별도 확인 필요 |
위 결과는 CVE-2026-123007의 주요 노출 조건을 확인하기 위한 것이다. 실제 취약점 공격 성공 여부를 확인한 것은 아니다.
4. 기존 소스 코드 백업
패치 적용 중 문제가 발생할 경우 기존 소스 코드로 복구할 수 있도록 백업한다.
# cd /opt/nginx-lab/src

# cp -a nginx-1.31.8 nginx-1.31.8.before-patch
백업 결과:
- 원본:
/opt/nginx-lab/src/nginx-1.31.8 - 백업:
/opt/nginx-lab/src/nginx-1.31.8.before-patch
# cp -a는 파일 및 디렉터리의 권한, 소유권, 시간 정보 등 가능한 속성을 유지하면서 복사한다.
5. NGINX 1.31.9 변경사항 추출
5-1. Git 저장소 이동
# cd /usr/local/src/nginx-upstream
5-2. 1.31.8과 1.31.9의 변경사항 비교
# git diff release-1.31.8 release-1.31.9 \
    -- src/ ':!src/core/nginx.h' \
    > /opt/nginx-lab/src/nginx-1.31.9-security.patch
명령어 설명:
git diff: 두 Git 참조 사이의 변경사항 비교release-1.31.8: 비교 기준이 되는 기존 버전release-1.31.9: 변경사항을 가져올 버전- src/: src 디렉터리 아래 변경사항만 비교:!src/core/nginx.h: nginx.h 파일은 비교 대상에서 제외>: 비교 결과를 지정한 파일에 저장
여기서 nginx.h를 제외한 이유는 NGINX 버전 문자열을 기존 1.31.8로 유지하기 위해서다.
따라서 패치 적용 후에도 실행 파일의 버전 출력은 1.31.8로 표시된다.
5-3. 패치 파일 생성 확인
# wc -l /opt/nginx-lab/src/nginx-1.31.9-security.patch
실제 출력:
1482 /opt/nginx-lab/src/nginx-1.31.9-security.patch
패치 파일의 일부 내용을 확인한다.
# head -n 30 /opt/nginx-lab/src/nginx-1.31.9-security.patch
실제 출력 중 일부:
diff --git a/src/core/nginx.c b/src/core/nginx.c
index 464911f60..a71d4cee7 100644
--- a/src/core/nginx.c
+++ b/src/core/nginx.c
@@ -368,7 +368,7 @@ main(int argc, char *const *argv)
 #endif

 #if (NGX_CONTROL_API)
-    if (ngx_process == NGX_PROCESS_SINGLE) {
+    if (ngx_control_api_enabled && ngx_process == NGX_PROCESS_SINGLE) {
         ngx_log_error(NGX_LOG_WARN, cycle->log, 0,
                       "control API unavailable in single process mode");

diff --git a/src/core/ngx_proxy_protocol.c b/src/core/ngx_proxy_protocol.c
index d1ff171bc..31e1bd76a 100644
--- a/src/core/ngx_proxy_protocol.c
+++ b/src/core/ngx_proxy_protocol.c
@@ -954,6 +954,10 @@ ngx_proxy_protocol_v2_ssl_sub(ngx_connection_t *c, ngx_uint_t type,
     case NGX_PROXY_PROTOCOL_TLV_SSL_SIG_ALG:
         cert = SSL_get_certificate(c->ssl->connection);

+        if (cert == NULL) {
+            return NGX_DECLINED;
+        }
+
         out->data = (u_char *) OBJ_nid2sn(X509_get_signature_nid(cert));
         out->len = ngx_strlen(out->data);
         return NGX_OK;
위 내용은 1.31.8과 1.31.9 사이의 실제 소스 변경사항 중 일부다.
참고로 패치 파일명은 security.patch이지만, 이 파일은 보안 수정사항만 별도로 추출한 파일이 아니다. src/core/nginx.h를 제외한 src/ 전체 변경사항이 포함되어 있다.
따라서 보안 수정뿐 아니라 일반 버그 수정 및 기능 변경도 포함될 수 있다.
6. 패치 적용 전 사전 검사
패치 파일을 바로 적용하기 전에 기존 소스 코드와 패치 내용이 정상적으로 일치하는지 확인한다.
# cd /opt/nginx-lab/src/nginx-1.31.8
# patch -p1 --dry-run --fuzz=0 \ < /opt/nginx-lab/src/nginx-1.31.9-security.patch
실제 출력:
checking file src/core/nginx.c
checking file src/core/ngx_proxy_protocol.c
checking file src/core/ngx_resolver.c
checking file src/event/ngx_event_openssl.c
checking file src/event/ngx_event_openssl.h
checking file src/event/ngx_event_openssl_stapling.c
checking file src/event/quic/ngx_event_quic_streams.c
checking file src/http/modules/ngx_http_geoip_module.c
checking file src/http/modules/ngx_http_index_module.c
checking file src/http/modules/ngx_http_limit_conn_module.c
checking file src/http/modules/ngx_http_map_module.c
checking file src/http/modules/ngx_http_proxy_module.c
checking file src/http/modules/ngx_http_proxy_v2_module.c
checking file src/http/modules/ngx_http_try_files_module.c
checking file src/http/ngx_http_parse.c
checking file src/http/ngx_http_request_body.c
checking file src/http/ngx_http_upstream_round_robin.c
checking file src/http/v2/ngx_http_v2.c
checking file src/http/v2/ngx_http_v2.h
checking file src/http/v2/ngx_http_v2_filter_module.c
checking file src/http/v3/ngx_http_v3_request.c
checking file src/http/v3/ngx_http_v3_table.c
checking file src/mail/ngx_mail_auth_http_module.c
checking file src/mail/ngx_mail_handler.c
checking file src/mail/ngx_mail_proxy_module.c
checking file src/mail/ngx_mail_smtp_handler.c
checking file src/os/unix/ngx_control.c
checking file src/os/unix/ngx_process_cycle.c
checking file src/stream/ngx_stream_geoip_module.c
checking file src/stream/ngx_stream_limit_conn_module.c
checking file src/stream/ngx_stream_map_module.c
checking file src/stream/ngx_stream_ssl_module.c
checking file src/stream/ngx_stream_ssl_preread_module.c
checking file src/stream/ngx_stream_upstream_round_robin.c
총 34개 파일을 검사했다.
-dry-run은 실제 파일을 변경하지 않고 패치 적용 가능 여부만 검사하는 옵션이다.-fuzz=0은 패치 적용 과정에서 문맥이 일부 일치하지 않아도 강제로 적용하는 Fuzz 기능을 허용하지 않는 옵션이다.
7. 패치 적용
사전 검사에서 문제가 없음을 확인했으므로 실제 패치를 적용한다.
# cd /opt/nginx-lab/src/nginx-1.31.8

# patch -p1 --fuzz=0 \
    < /opt/nginx-lab/src/nginx-1.31.9-security.patch
실제 출력은 사전 검사와 동일한 34개 파일에 대해 다음 형태로 표시되었다.
patching file src/core/nginx.c
patching file src/core/ngx_proxy_protocol.c
...
patching file src/stream/ngx_stream_upstream_round_robin.c
모든 파일에 patching file 메시지가 출력되어 패치가 적용되었다.
8. 패치 적용 여부 확인
8-1. 기존 소스와 변경된 소스 비교
# diff -qr \
    --exclude=Makefile \
    --exclude=objs \
    /opt/nginx-lab/src/nginx-1.31.8.before-patch \
    /opt/nginx-lab/src/nginx-1.31.8
패치 적용 후 실제 출력:
checking file src/core/nginx.c
checking file src/core/ngx_proxy_protocol.c
checking file src/core/ngx_resolver.c
checking file src/event/ngx_event_openssl.c
checking file src/event/ngx_event_openssl.h
checking file src/event/ngx_event_openssl_stapling.c
checking file src/event/quic/ngx_event_quic_streams.c
checking file src/http/modules/ngx_http_geoip_module.c
checking file src/http/modules/ngx_http_index_module.c
checking file src/http/modules/ngx_http_limit_conn_module.c
checking file src/http/modules/ngx_http_map_module.c
checking file src/http/modules/ngx_http_proxy_module.c
checking file src/http/modules/ngx_http_proxy_v2_module.c
checking file src/http/modules/ngx_http_try_files_module.c
checking file src/http/ngx_http_parse.c
checking file src/http/ngx_http_request_body.c
checking file src/http/ngx_http_upstream_round_robin.c
checking file src/http/v2/ngx_http_v2.c
checking file src/http/v2/ngx_http_v2.h
checking file src/http/v2/ngx_http_v2_filter_module.c
checking file src/http/v3/ngx_http_v3_request.c
checking file src/http/v3/ngx_http_v3_table.c
checking file src/mail/ngx_mail_auth_http_module.c
checking file src/mail/ngx_mail_handler.c
checking file src/mail/ngx_mail_proxy_module.c
checking file src/mail/ngx_mail_smtp_handler.c
checking file src/os/unix/ngx_control.c
checking file src/os/unix/ngx_process_cycle.c
checking file src/stream/ngx_stream_geoip_module.c
checking file src/stream/ngx_stream_limit_conn_module.c
checking file src/stream/ngx_stream_map_module.c
checking file src/stream/ngx_stream_ssl_module.c
checking file src/stream/ngx_stream_ssl_preread_module.c
checking file src/stream/ngx_stream_upstream_round_robin.c
총 34개 파일에서 변경사항이 확인되었다.
8-2. 특정 코드 변경 여부 확인
# grep -n -A 8 -B 3 \
    'cert == NULL' \
    src/core/ngx_proxy_protocol.c
실제 출력:
911-
912-    case NGX_PROXY_PROTOCOL_TLV_SSL_CN:
913-        cert = SSL_get_peer_certificate(c->ssl->connection);
914:        if (cert == NULL) {
915-            return NGX_DECLINED;
916-        }
917-
918-        subject = X509_get_subject_name(cert);
919-        if (subject == NULL) {
920-            X509_free(cert);
921-            return NGX_ERROR;
922-        }
--
954-    case NGX_PROXY_PROTOCOL_TLV_SSL_SIG_ALG:
955-        cert = SSL_get_certificate(c->ssl->connection);
956-
957:        if (cert == NULL) {
958-            return NGX_DECLINED;
959-        }
960-
961-        out->data = (u_char *) OBJ_nid2sn(X509_get_signature_nid(cert));
962-        out->len = ngx_strlen(out->data);
963-        return NGX_OK;
964-
965-    case NGX_PROXY_PROTOCOL_TLV_SSL_KEY_ALG:
966-        cert = SSL_get_certificate(c->ssl->connection);
967-
968:        if (cert == NULL) {
969-            return NGX_DECLINED;
970-        }
971-
972-        pkey = X509_get_pubkey(cert);
973-        if (pkey == NULL) {
974-            return NGX_ERROR;
해당 코드에서 인증서 객체가 NULL인 경우 추가 처리가 이루어지도록 변경된 것을 확인할 수 있다.
9. NGINX 재빌드
9-1. configure
configure는 소스 코드를 컴파일하기 전에 운영체제 및 컴파일러 환경을 확인하고, 빌드 옵션과 설치 경로를 설정하는 스크립트다.
주요 역할은 다음과 같다.
- 컴파일러 및 시스템 환경 확인
- 필요한 라이브러리 및 헤더 파일 확인
- 빌드할 모듈 지정
- 설치 경로 지정
- Makefile 및 빌드 설정 파일 생성
이번 실습에서는 다음과 같이 실행했다.
cd /opt/nginx-lab/src/nginx-1.31.8

./configure \
    --prefix=/opt/nginx-lab/versions/nginx-1.31.8-patched \
    --with-http_ssl_module \
    --with-http_v2_module \
    --with-threads
> 옵션 설명:
| 옵션 | 설명 |
|---|---|
--prefix |
NGINX 설치 경로 |
--with-http_ssl_module |
HTTPS 지원 모듈 활성화 |
--with-http_v2_module |
HTTP/2 지원 모듈 활성화 |
--with-threads |
스레드 풀 기능 활성화 |
configure 실행 후 objs/ 디렉터리 아래 빌드 설정 파일들이 생성된다.
대표적인 파일은 다음과 같다.
objs/Makefileobjs/ngx_auto_config.hobjs/ngx_modules.c
9-2. configure 결과에서 설치 경로 확인
# grep -n 'NGX_PREFIX\|NGX_CONF_PREFIX' objs/ngx_auto_config.h
실제 출력:
478:#ifndef NGX_PREFIX
479:#define NGX_PREFIX  "/opt/nginx-lab/versions/nginx-1.31.8-patched/"
483:#ifndef NGX_CONF_PREFIX
484:#define NGX_CONF_PREFIX  "conf/"
위 결과에서 설치 경로가 정상적으로 설정된 것을 확인할 수 있다.
9-3. make
make는 Makefile에 정의된 작업 규칙을 읽고 실제 소스 코드를 컴파일하는 빌드 도구다.
configure가 빌드 환경을 준비하는 단계라면 make는 해당 설정을 바탕으로 실행 파일을 생성하는 단계다.
# make
실제 마지막 출력:
make[1]: Leaving directory '/opt/nginx-lab/src/nginx-1.31.8'
빌드 결과물 확인:
# ls -lh objs/nginx
실제 출력:
-rwxr-xr-x 1 root root 5.5M Nov 21 18:44 objs/nginx
objs/nginx 파일이 생성된 것을 확인할 수 있다.
9-4. make install
make install은 make를 통해 생성한 실행 파일과 관련 파일을 configure에서 지정한 설치 경로에 배치하는 단계다.
# make install
실제 출력 중 주요 내용:
make -f objs/Makefile install
make[1]: Entering directory '/opt/nginx-lab/src/nginx-1.31.8'
test -d '/opt/nginx-lab/versions/nginx-1.31.8-patched' || mkdir -p '/opt/nginx-lab/versions/nginx-1.31.8-patched'
test -d '/opt/nginx-lab/versions/nginx-1.31.8-patched/sbin' \
    || mkdir -p '/opt/nginx-lab/versions/nginx-1.31.8-patched/sbin'
test ! -f '/opt/nginx-lab/versions/nginx-1.31.8-patched/sbin/nginx' \
    || mv '/opt/nginx-lab/versions/nginx-1.31.8-patched/sbin/nginx' \
        '/opt/nginx-lab/versions/nginx-1.31.8-patched/sbin/nginx.old'
cp objs/nginx '/opt/nginx-lab/versions/nginx-1.31.8-patched/sbin/nginx'
...
test -f '/opt/nginx-lab/versions/nginx-1.31.8-patched/conf/nginx.conf' \
    || cp conf/nginx.conf '/opt/nginx-lab/versions/nginx-1.31.8-patched/conf/nginx.conf'
...
make[1]: Leaving directory '/opt/nginx-lab/src/nginx-1.31.8'
설치된 실행 파일 확인:
# ls -lh /opt/nginx-lab/versions/nginx-1.31.8-patched/sbin/nginx
실제 출력:
-rwxr-xr-x 1 root root 5.5M Nov 21 18:46 /opt/nginx-lab/versions/nginx-1.31.8-patched/sbin/nginx
9-5. configure, make, make install 차이
| 명령어 | 역할 | 주요 결과 |
|---|---|---|
./configure |
빌드 환경 및 옵션 설정 | Makefile 및 설정 파일 생성 |
make |
소스 코드 컴파일 | objs/nginx 생성 |
make install |
실행 파일 및 관련 파일 설치 | 지정한 prefix 경로에 파일 배치 |
전체 과정은 다음과 같다.
NGINX 소스 코드
       |
       v
  ./configure
       |
       v
빌드 환경 및 Makefile 생성
       |
       v
     make
       |
       v
   objs/nginx
       |
       v
  make install
       |
       v
지정된 설치 경로에 배치
10. 설치된 NGINX 확인
10-1. 버전 및 빌드 옵션 확인
# /opt/nginx-lab/versions/nginx-1.31.8-patched/sbin/nginx -V
실제 출력:

버전이 1.31.8로 표시되는 이유는 패치 파일 생성 시 src/core/nginx.h를 제외했기 때문이다.
따라서 해당 출력만으로 패치 적용 여부를 판단해서는 안 된다.
소스 코드 변경 비교와 실제 빌드 결과를 함께 확인해야 한다.
11. NGINX 설정 구성
11-1. 설정 파일 경로
# /opt/nginx-lab/versions/nginx-1.31.8-patched/conf/nginx.conf
11-2. HTTP 및 HTTPS 설정
이번 실습에서는 HTTP 80 포트와 HTTPS 18443 포트를 사용한다.
#user  nobody;
worker_processes  1;

events {
    worker_connections  1024;
}

http {
    include       mime.types;
    default_type  application/octet-stream;

    sendfile        on;
    keepalive_timeout  65;

    # HTTP server
    server {
        listen       80;
        server_name  localhost;

        location / {
            root   html;
            index  index.html index.htm;
        }

        error_page   500 502 503 504  /50x.html;

        location = /50x.html {
            root   html;
        }
    }

    # HTTPS server
    server {
        listen 18443 ssl;
        http2 on;
        server_name localhost;

        ssl_certificate     /opt/nginx-lab/certs/server.crt;
        ssl_certificate_key /opt/nginx-lab/certs/server.key;

        ssl_session_cache    shared:SSL:1m;
        ssl_session_timeout  5m;

        location / {
            root   html;
            index  index.html index.htm;
        }
    }
}
HTTP/2 활성화 설정:
listen 18443 ssl;
http2 on;
인증서 경로:
- 인증서:
/opt/nginx-lab/certs/server.crt - 개인키:
/opt/nginx-lab/certs/server.key
12. NGINX 설정 검사
# /opt/nginx-lab/versions/nginx-1.31.8-patched/sbin/nginx -t
실제 출력:

설정 파일의 문법과 설정 검사가 정상적으로 완료되었다.
13. NGINX 실행 및 상태 확인
13-1. NGINX 실행
# /opt/nginx-lab/versions/nginx-1.31.8-patched/sbin/nginx
13-2. 프로세스 확인
# ps -ef | grep '[n]ginx'
실제 출력:
root       35631       1  0 18:30 ?        00:00:00 nginx: master process /opt/nginx-lab/versions/nginx-1.31.8-patched/sbin/nginx
nobody     35680   35631  0 18:39 ?        00:00:00 nginx: worker process
Master Process와 Worker Process가 정상적으로 실행 중인 것을 확인할 수 있다.
13-3. 포트 확인
# ss -lntp | grep -E ':80|:18443'
실제 출력:
LISTEN 0      511          0.0.0.0:18443      0.0.0.0:*    users:(("nginx",pid=35680,fd=10),("nginx",pid=35631,fd=10))
LISTEN 0      511          0.0.0.0:80         0.0.0.0:*    users:(("nginx",pid=35680,fd=6),("nginx",pid=35631,fd=6))
80 및 18443 포트가 LISTEN 상태인 것을 확인할 수 있다.
14. NGINX 종료 및 재기동
14-1. 정상 종료
# /opt/nginx-lab/versions/nginx-1.31.8-patched/sbin/nginx -s quit
quit은 NGINX를 정상적으로 종료하도록 요청하는 명령이다.
> 종료 여부 확인:
# ps -ef | grep '[n]ginx'
이 시점에는 프로세스 출력이 없는 것을 확인했다.
14-2. 재기동
# /opt/nginx-lab/versions/nginx-1.31.8-patched/sbin/nginx
> 프로세스 확인 :
# ps -ef | grep '[n]ginx'
> 포트 확인:
# ss -lntp | grep -E ':80|:18443'

재기동 이후에도 Master Process와 Worker Process가 정상적으로 실행되고, 지정한 포트가 LISTEN 상태인 것을 확인했다.
15. HTTP/2 통신 확인
15-1. curl을 이용한 HTTP/2 요청
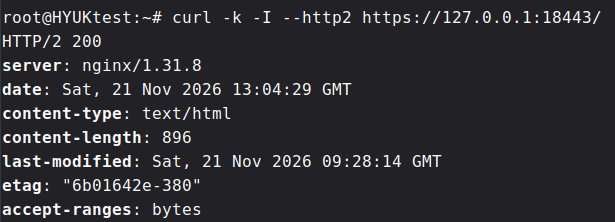
> 결과 분석:
- HTTP/2 200: HTTP/2 요청에 정상 응답
- server: nginx/1.31.8: 응답을 처리한 NGINX 버전 표시
- content-type: text/html: HTML 콘텐츠 응답
- content-length: 896: 응답 콘텐츠 길이
- k 옵션은 테스트 인증서의 인증서 검증을 생략하기 위해 사용했다.
위 결과는 HTTPS 연결과 HTTP/2 통신이 정상적으로 이루어졌음을 의미한다.
다만 HTTP/2 200 응답은 서비스 통신 정상 여부를 확인한 것이며, 취약점이 실제로 악용되지 않는다는 것을 증명하는 결과는 아니다.
16. 최종 실습 결과 및 한계
16-1. 실습 결과
| 구분 | 결과 |
|---|---|
| 패치 파일 생성 | 완료 |
| 패치 파일 사전 검사 | 34개 파일 확인 |
| 패치 적용 | 34개 파일 적용 |
| 소스 코드 변경 확인 | 34개 파일 변경 확인 |
| configure | 완료 |
| make | 완료 |
| make install | 완료 |
| 설치된 실행 파일 확인 | 5.5MB |
| NGINX 설정 검사 | 정상 |
| NGINX 프로세스 확인 | 정상 |
| HTTP/2 통신 확인 | HTTP/2 200 |
16-2. 실습 시 유의사항
- 이번 패치 파일은 NGINX 1.31.8과 1.31.9의
src/전체 변경사항에서src/core/nginx.h만 제외하여 생성했다. 따라서 보안 수정사항 외의 일반 변경사항도 포함한다. - NGINX 버전 문자열을 유지했기 때문에 패치 후에도
nginx -v는 1.31.8로 표시된다. 버전 출력만으로 패치 적용 여부를 판단해서는 안 된다. - 이번 실습에서는 각 CVE에 대한 개별 공격 재현이나 익스플로잇 검증을 수행하지 않았다.
- 테스트 설정에서는 HTTP/2를 활성화했지만, HTTP/3/QUIC, mail proxy, resolver와 variable proxy_pass 및 mirror 조합 등 나머지 취약점의 구성 조건은 실습하지 않았다.
curl을 통한 HTTP/2 응답 확인은 서비스 통신 검증이며 취약점 수정 여부를 직접 증명하는 테스트가 아니다.- 실제 운영 서버에서는 소스 코드 패치만으로 작업이 끝나는 것이 아니다. 새 바이너리를 서비스 프로세스에 적용하고, 기존 Worker Process가 종료되었는지 확인하는 과정까지 필요하다.
16-3. 최종 정리
이번 실습을 통해 기존 NGINX 소스 코드와 수정 버전의 변경사항을 비교하고, 패치 파일 생성부터 적용, 재빌드 및 설치까지의 과정을 확인했다.
또한 설치된 NGINX의 설정과 프로세스 상태를 점검하고 HTTP/2 통신이 정상적으로 이루어지는 것을 확인했다.
이번 실습은 NGINX 취약점 대응을 위한 소스 코드 패치 및 재빌드 절차를 익히는 데 목적이 있으며, 개별 취약점의 실제 악용 가능성이나 패치의 보안 효과를 공격 테스트로 입증한 것은 아니다.
17. 참고 자료
01. Xint – NGINX2Root: nginx 원격 코드 실행 취약점 분석 및 긴급 패치 권고
https://xint.io/ko/blog/nginx2root-remote-code-execution
02. NGINX 공식 보안 권고
https://nginx.org/en/security_advisories.html
03. NGINX 공식 GitHub 저장소
https://github.com/nginx/nginx
04.NGINX 1.31.9 Release
https://github.com/nginx/nginx/releases/tag/release-1.31.9
“이 글은 본인의 실제 경험과 학습을 기반으로 직접 작성하였으며, AI는 참고용으로만 활용하였습니다.”