메뉴 닫기

[Ansible]을 이용한 nginx 캐시 서버 세팅

Ansible 을 이용하여 관리노드에 nginx 캐시 서버 세팅을 진행 해보았습니다. 

앤서블 은 설치, 관리 등 인프라 자동 구축을 위한 프로그램입니다.

현재는 레드햇 과 앤서블 커뮤니티에 의해서 관리 되고 있는 python 기반 오픈소스 프로그램으로 

ssh 를 기반으로 명령을 전달, 실행하여 관리대상 서버에 별도의 에이전트 설치가 필요 없다는 특징이 있습니다.


종    류   엔지니어 / 엔서블 Ansible
난이도  하
내용요약

Ansible 기본설치, 관리노드 웹데몬 설치

 유저, 가상호스트 생성 테스트

테스트 환경 Linux Rocky 9  2대 
관련직무 시스템&클라우드 엔지니어


테스트 환경


서버 OS

Rocky Linux 9   


Ansible설치 

Python 3.9 가 설치된 거의 대부분의 Unix 계열 OS 에서 설치 가능합니다. 

메니지드 노드는 컨트롤 노드에서 생성한 코드를 실행 하기 위해   Python 2.7, or Python 3.5 – 3.11 과  

POSIX 셸을 통해 노드에 SSH로 연결할 수 있는 사용자 계정이 필요합니다


컨트롤 노드 에서 설치를 진행합니다.

sudo dnf install ansible  ansible-collection-community-general

*EPEL 레포지토리가 필요하므로 없는 경우  epel-release 를 먼저 설치 합니다. 


기본 설치시  /etc/ansible 에 설정 파일들이 생성 됩니다.  


사용 방법

메니지드 노드들에 대한 정보가 담겨있는 인벤토리 와  

실행할 코드들이 담긴 플레이북 으로 관리 합니다.  


준비 작업 

SSH 를 통해 작업이 진행 되므로  ssh-keygen 을 이용하여 SSH 키 를 전달 해둡니다.  


기본 인벤토리는  /etc/ansible/hosts  를 사용하며  

해당 파일을 열면  ini  방식의 인벤토리 구조를 확인 할 수 있습니다.  

hosts.txt


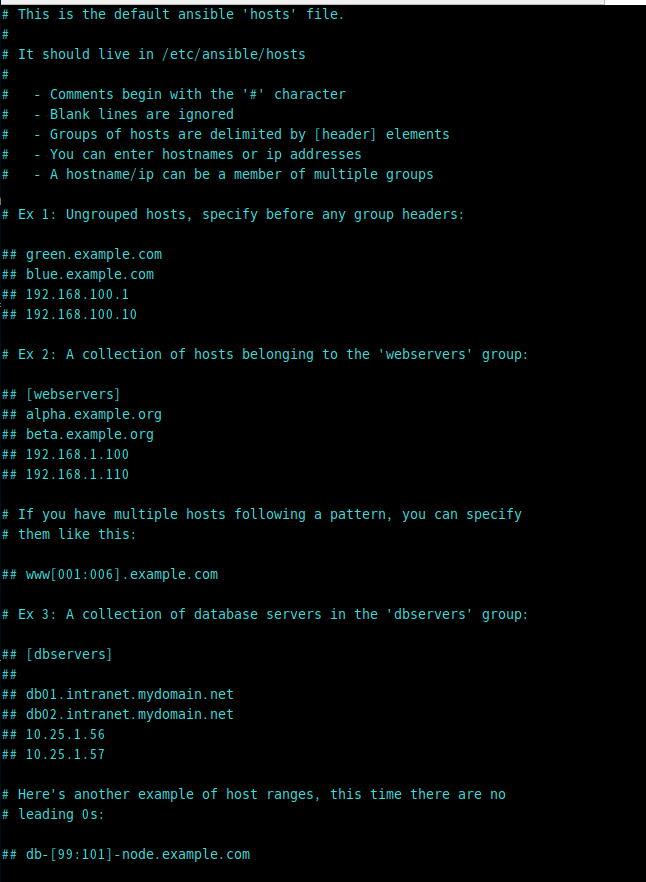
그룹 없이 도메인, IP  로  입력 가능하며  가능하며  


[그룹이름]    으로 그룹을 만들어서 

그 아래  해당 그룹에 들어갈 호스트들을 입력 할 수 있습니다.  


호스트 등록할 때    img[001:005].iwinv.kr  처럼  

패턴으로 다수 도메인 적용도 가능합니다.  


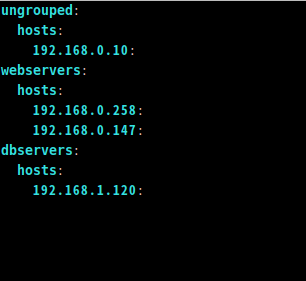
인벤토리는 기본적인 ini 방식 이외에  yaml 로도 관리 가능합니다.

inven_yaml


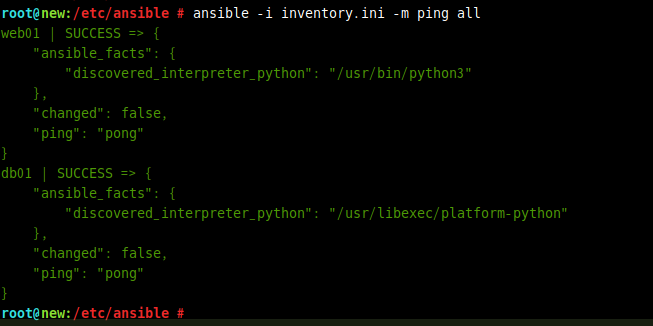
인벤토리 를 만든 후 아래 와 같은 명령으로  연결상태를 체크 할 수 있습니다. 

ansible -i 인벤토리 -m ping (그룹 or all) 

pingtest


플레이북 은 yaml 로 작성 합니다. 

아래는 apache 를 설치 하도록 하는  playbook 입니다. 


Plain text
Copy to clipboard
Open code in new window
EnlighterJS 3 Syntax Highlighter
---
- hosts: servers
become: true # Run tasks with sudo (root) privileges
tasks:
- name: Update package cache
package:
name: '*'
state: latest
become: true
- name: Install Apache
package:
name: httpd
state: present
- name: Start Apache service
service:
name: httpd
state: started
enabled: true
...
--- - hosts: servers become: true # Run tasks with sudo (root) privileges tasks: - name: Update package cache package: name: '*' state: latest become: true - name: Install Apache package: name: httpd state: present - name: Start Apache service service: name: httpd state: started enabled: true ...
---
- hosts: servers
  become: true  # Run tasks with sudo (root) privileges

  tasks:
    - name: Update package cache
      package:
        name: '*'
        state: latest
      become: true

    - name: Install Apache
      package:
        name: httpd
        state: present

    - name: Start Apache service
      service:
        name: httpd
        state: started
        enabled: true
...


엔서블의 yaml  관련된 자세한 사항은  다음 링크에서 확인 가능합니다.  (앤서블 docs)


NGINX 리버스 프록시 캐시 서버 세팅  


아래는 테스트에 사용한 playbook yaml  구성 입니다.    

실행할 명령이 담긴  playbook.yml 파일 하나와  

추가할 계정의 가상호스트 설정 파일이 담겨있는 conf.j2  파일 두가지 로 구성 되어있습니다.  

Plain text
Copy to clipboard
Open code in new window
EnlighterJS 3 Syntax Highlighter
---
- hosts: web
become: true # Run tasks with sudo (root) privileges
tasks:
- name: Install Nginx
package:
name: nginx
state: present
- name: Install Apache
package:
name: httpd
state: present
- name: Change Apache Listening Port
lineinfile:
path: /etc/httpd/conf/httpd.conf
regexp: '^Listen '
line: 'Listen 8080'
notify: Restart Apache
- name: Ensure Nginx is enabled and started
systemd:
name: nginx
enabled: yes
state: started
- name: Ensure Apache is enabled and started
systemd:
name: httpd
enabled: yes
state: started
handlers:
- name: Restart Nginx
service:
name: nginx
state: restarted
- name: Restart Apache
service:
name: httpd
state: restarted
...
--- - hosts: web become: true # Run tasks with sudo (root) privileges tasks: - name: Install Nginx package: name: nginx state: present - name: Install Apache package: name: httpd state: present - name: Change Apache Listening Port lineinfile: path: /etc/httpd/conf/httpd.conf regexp: '^Listen ' line: 'Listen 8080' notify: Restart Apache - name: Ensure Nginx is enabled and started systemd: name: nginx enabled: yes state: started - name: Ensure Apache is enabled and started systemd: name: httpd enabled: yes state: started handlers: - name: Restart Nginx service: name: nginx state: restarted - name: Restart Apache service: name: httpd state: restarted ...
---
- hosts: web
  become: true  # Run tasks with sudo (root) privileges


  tasks:
    - name: Install Nginx
      package:
        name: nginx
        state: present

    - name: Install Apache
      package:
        name: httpd
        state: present

    - name: Change Apache Listening Port
      lineinfile:
        path: /etc/httpd/conf/httpd.conf
        regexp: '^Listen '
        line: 'Listen 8080'
      notify: Restart Apache

    - name: Ensure Nginx is enabled and started
      systemd:
        name: nginx
        enabled: yes
        state: started

    - name: Ensure Apache is enabled and started
      systemd:
        name: httpd
        enabled: yes
        state: started


  handlers:
    - name: Restart Nginx
      service:
        name: nginx
        state: restarted

    - name: Restart Apache
      service:
        name: httpd
        state: restarted
...


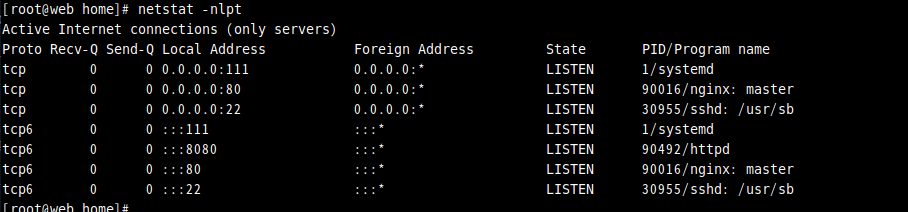
 nginx 가 80  포트로 받아서  백그라운드에 있는   apache 8080 포트로 연결 되는 구조로 세팅 됩니다.  


 ” ansible-playbook   -i 인벤토리  플레이북 파일 ” 로 실행 합니다.  
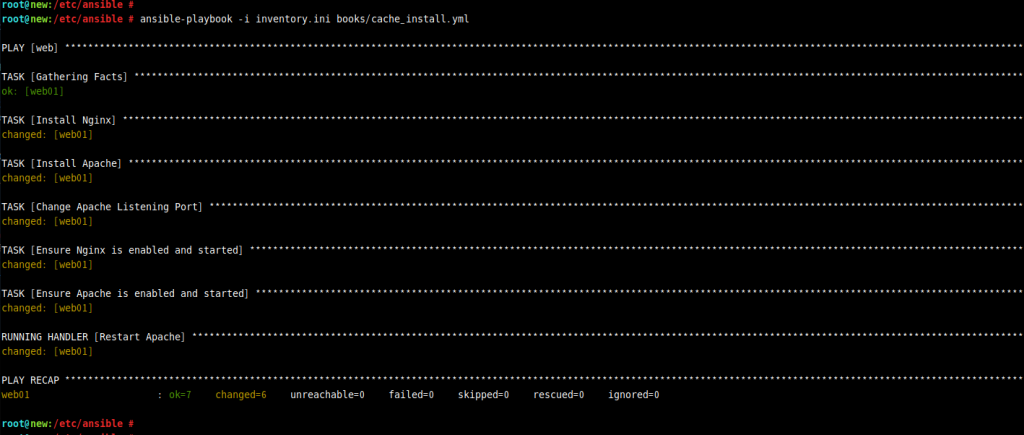
 

code

진행 결과가 바로 표시 됩니다.   


메니지드 노드 에서 확인 하면 아파치와  nginx 가 정상 설치되어 올라와 있는 것을 확인 할 수 있습니다. 

code


서비스 사용을 위한 계정 생성 테스트를 진행하였습니다.  

Plain text
Copy to clipboard
Open code in new window
EnlighterJS 3 Syntax Highlighter
---
- hosts: web
become: true
vars:
new_user_id: "test"
new_user_password: "testuserpassword"
home_directory: "/cache_user/{{ new_user_id }}"
home_directory_permissions: "0755"
tasks:
- name: Add User with Home Directory
user:
name: "{{ new_user_id }}"
state: present
createhome: yes
home: "{{ home_directory }}"
- name: Change Password for New User
user:
name: "{{ new_user_id }}"
password: "{{ new_user_password | password_hash('sha512') }}"
update_password: always
- name: Set Permissions for User's Home Directory
file:
path: "{{ home_directory }}"
state: directory
mode: "{{ home_directory_permissions }}"
recurse: yes
- name: Configure Apache Virtual Host for New User
template:
src: apache_virtual_host_user.conf.j2
dest: "/etc/httpd/conf.d/{{ new_user_id }}.conf"
notify: Restart Apache
- name: Configure Nginx Virtual Host for New User
template:
src: nginx_virtual_host_user.conf.j2
dest: "/etc/nginx/conf.d/{{ new_user_id }}.conf"
notify: Restart Nginx
handlers:
- name: Restart Nginx
service:
name: nginx
state: restarted
- name: Restart Apache
service:
name: httpd
state: restarted
... 54,3 바닥
--- - hosts: web become: true vars: new_user_id: "test" new_user_password: "testuserpassword" home_directory: "/cache_user/{{ new_user_id }}" home_directory_permissions: "0755" tasks: - name: Add User with Home Directory user: name: "{{ new_user_id }}" state: present createhome: yes home: "{{ home_directory }}" - name: Change Password for New User user: name: "{{ new_user_id }}" password: "{{ new_user_password | password_hash('sha512') }}" update_password: always - name: Set Permissions for User's Home Directory file: path: "{{ home_directory }}" state: directory mode: "{{ home_directory_permissions }}" recurse: yes - name: Configure Apache Virtual Host for New User template: src: apache_virtual_host_user.conf.j2 dest: "/etc/httpd/conf.d/{{ new_user_id }}.conf" notify: Restart Apache - name: Configure Nginx Virtual Host for New User template: src: nginx_virtual_host_user.conf.j2 dest: "/etc/nginx/conf.d/{{ new_user_id }}.conf" notify: Restart Nginx handlers: - name: Restart Nginx service: name: nginx state: restarted - name: Restart Apache service: name: httpd state: restarted ... 54,3 바닥
---
- hosts: web
  become: true

  vars:
    new_user_id: "test"  
    new_user_password: "testuserpassword"  
    home_directory: "/cache_user/{{ new_user_id }}"
    home_directory_permissions: "0755"  

  tasks:
    - name: Add User with Home Directory
      user:
        name: "{{ new_user_id }}"
        state: present
        createhome: yes
        home: "{{ home_directory }}"

    - name: Change Password for New User
      user:
        name: "{{ new_user_id }}"
        password: "{{ new_user_password | password_hash('sha512') }}"
        update_password: always  

    - name: Set Permissions for User's Home Directory
      file:
        path: "{{ home_directory }}"
        state: directory
        mode: "{{ home_directory_permissions }}"
        recurse: yes

    - name: Configure Apache Virtual Host for New User
      template:
        src: apache_virtual_host_user.conf.j2
        dest: "/etc/httpd/conf.d/{{ new_user_id }}.conf"
      notify: Restart Apache

    - name: Configure Nginx Virtual Host for New User
      template:
        src: nginx_virtual_host_user.conf.j2
        dest: "/etc/nginx/conf.d/{{ new_user_id }}.conf"
      notify: Restart Nginx

  handlers:
    - name: Restart Nginx
      service:
        name: nginx
        state: restarted 

    - name: Restart Apache
      service:
        name: httpd
        state: restarted
...                                                                                                                                                                       54,3         바닥


nginx  가상호스트 설정 파일 정보가 담긴   nginx_virtual_host_user.conf.j2  입니다. 

Plain text
Copy to clipboard
Open code in new window
EnlighterJS 3 Syntax Highlighter
server {
listen 80;
server_name {{ new_user_id }}.sample.domain;
location / {
proxy_pass http://127.0.0.1:8080;
proxy_set_header Host $host;
proxy_set_header X-Real-IP $remote_addr;
proxy_set_header X-Forwarded-For $proxy_add_x_forwarded_for;
proxy_set_header X-Forwarded-Proto $scheme;
}
}
server { listen 80; server_name {{ new_user_id }}.sample.domain; location / { proxy_pass http://127.0.0.1:8080; proxy_set_header Host $host; proxy_set_header X-Real-IP $remote_addr; proxy_set_header X-Forwarded-For $proxy_add_x_forwarded_for; proxy_set_header X-Forwarded-Proto $scheme; } }
server {
    listen 80;
    server_name {{ new_user_id }}.sample.domain;

    location / {
        proxy_pass http://127.0.0.1:8080;
        proxy_set_header Host $host;
        proxy_set_header X-Real-IP $remote_addr;
        proxy_set_header X-Forwarded-For $proxy_add_x_forwarded_for;
        proxy_set_header X-Forwarded-Proto $scheme;
    }
}


apache  가상호스트  apache_virtual_host_user.conf.j2  

Plain text
Copy to clipboard
Open code in new window
EnlighterJS 3 Syntax Highlighter
<VirtualHost *:8080>
ServerAdmin webmaster@{{ new_user_id }}.com
ServerName {{ new_user_id }}.sample.domain
DocumentRoot /CACHE_USER/{{ new_user_id }}
<Directory /CACHE_USER/{{ new_user_id }}>
Options Indexes FollowSymLinks
AllowOverride All
Require all granted
</Directory>
ErrorLog /var/log/httpd/{{ new_user_id }}_error.log
CustomLog /var/log/httpd/{{ new_user_id }}_access.log combined
</VirtualHost>
<VirtualHost *:8080> ServerAdmin webmaster@{{ new_user_id }}.com ServerName {{ new_user_id }}.sample.domain DocumentRoot /CACHE_USER/{{ new_user_id }} <Directory /CACHE_USER/{{ new_user_id }}> Options Indexes FollowSymLinks AllowOverride All Require all granted </Directory> ErrorLog /var/log/httpd/{{ new_user_id }}_error.log CustomLog /var/log/httpd/{{ new_user_id }}_access.log combined </VirtualHost>
<VirtualHost *:8080>
    ServerAdmin webmaster@{{ new_user_id }}.com
    ServerName {{ new_user_id }}.sample.domain
    DocumentRoot /CACHE_USER/{{ new_user_id }}

    <Directory /CACHE_USER/{{ new_user_id }}>
        Options Indexes FollowSymLinks
        AllowOverride All
        Require all granted
    </Directory>

    ErrorLog /var/log/httpd/{{ new_user_id }}_error.log
    CustomLog /var/log/httpd/{{ new_user_id }}_access.log combined
</VirtualHost>


동일하게  ansible-playbook 으로  실행시  메니지드노드에 사용자와 가상호스트설정이 추가 됩니다. 

adduser


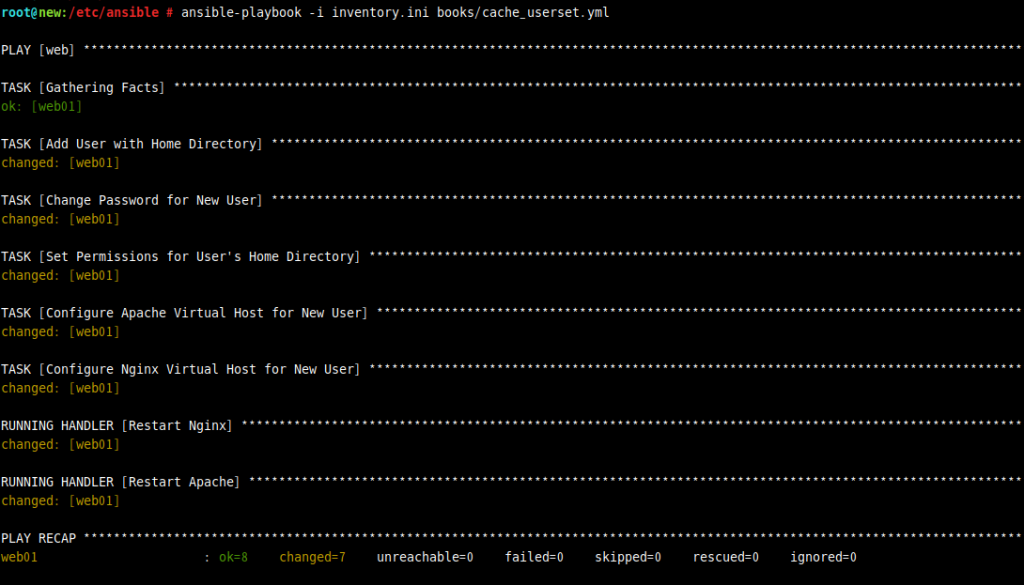
가상호스트 설정 파일과  유져 계정 관련 설정들 줄 일부만 약식으로 테스트 진행 해보았습니다. 


메니지드 노드, 서버에  아파치 데몬 설치 와 같은  서비스 세팅 이외에도   운영중인 노드에  사용자 추가, 정지 등 관리 용도로도 

사용이 가능 할 것으로 생각 됩니다.  


  1. https://www.ansible.com
  2. https://docs.ansible.com
Subscribe
Notify of
guest


0 Comments
Inline Feedbacks
View all comments
0
Would love your thoughts, please comment.x
()
x