메뉴 닫기

Ansible – DB replication install, monitoring

Ansible logo

Ansible – DB 리플리케이션 설치 및 모니터링

-은 쉽게 말씀드려 단순하고 반복 작업을 단축할 수 있으며 이러한 업무를 사람이 진행 시 오류가 날 수 있으나 자동화 프로그램으로 시간 단축 및 작업자 이슈를 예방 할 수 있는 서버 인프라 작업부분에게서는 매우 효율적이라고 볼 수 있습니다.

참고 게시글은
https://sysdocu.tistory.com/1858 

https://docs.ansible.com/ansible/2.9/modules/list_of_all_modules.html  두 링크를 참조 하였습니다. 

이제 시작해보겠습니다. 

해당 게시글은 4개 서버 모두 Ubuntu 22.04 로 진행 하였습니다. 

Ansible host 10.101.0.9
DB-Master(DB1)  10.101.0.3
DB-Slave(DB2)    10.101.0.23
DB-Slave(DB3)    10.101.0.17

host-node 작업

# apt -y install ansible sshpass
# ansible –version
ansible 2.10.8
  config file = None
  configured module search path = [‘/root/.ansible/plugins/modules’, ‘/usr/share/ansible/plugins/modules’]
  ansible python module location = /usr/lib/python3/dist-packages/ansible
  executable location = /usr/bin/ansible
  python version = 3.10.12 (main, Jun 11 2023, 05:26:28) [GCC 11.4.0]

hosts 처럼 ansible 명령어를 입력할때 servers.ini 에서 서버들을 확인하고 보내기때문에 아래처럼 내 IP들을 입력합니다 .

# vi servers.ini
[dball]
10.101.0.3
10.101.0.23
10.101.0.17
[db1]
10.101.0.3
[db2]
10.101.0.23
[db3]
10.101.0.17

ssh key 생성

# ssh-keygen 
Generating public/private rsa key pair.
Enter file in which to save the key (/root/.ssh/id_rsa): 
Enter passphrase (empty for no passphrase): 
Enter same passphrase again: 
Your identification has been saved in /root/.ssh/id_rsa
Your public key has been saved in /root/.ssh/id_rsa.pub
The key fingerprint is:
SHA256:SPVu3thY1cCNC+hp0+UT5anhavRJXNEFbzeeZelP6LI root@gusdn12p-220047
The key’s randomart image is:
+—[RSA 3072]—-+
|        .  . .o*=|
|       . .. . ==*|
|      .  ..o =.BO|
|     . . .= +.X+=|
|      . S.oo.=.=.|
|         o.*+….|
|          +o+o. .|
|          .  o   |
|            E    |
+—-[SHA256]—–+


# ssh-copy-id root@10.101.0.3
# ssh-copy-id root@10.101.0.23
# ssh-copy-id root@10.101.0.17

Ansible 연결 테스트

Ansible 에서 주로 사용하는 옵션은 세가지가 있습니다. (help 에서는 더 많은 옵션이 출력됩니다)
-m : 모듈
-i : 인벤토리
-u : 유저명
유저명은 제외하고 아래와 같이 인벤토리 (servers.ini) 에 등록된 모든 호스트에 ping 테스트를 해봅니다.
참고로 all 말고 섹션명을 지정해주면 인벤토리 내의 특정 세션에 등록된 호스트로만 명령을 실행합니다.

ping check!

# ansible -i servers.ini all -m ping
10.101.0.3 | SUCCESS => {
    “ansible_facts”: {
        “discovered_interpreter_python”: “/usr/bin/python3”
    },
    “changed”: false,
    “ping”: “pong”
}
10.101.0.17 | SUCCESS => {
    “ansible_facts”: {
        “discovered_interpreter_python”: “/usr/bin/python3”
    },
    “changed”: false,
    “ping”: “pong”
}
10.101.0.23 | SUCCESS => {
    “ansible_facts”: {
        “discovered_interpreter_python”: “/usr/bin/python3”
    },
    “changed”: false,
    “ping”: “pong”
}

Ansible 옵션

서버의 자원이 충분하여 동시에 처리되는 양을 늘리고자 할 경우 아래와 같이 설정파일을 수정하여 동시처리 개수를 늘릴 수 있습니다.
설정파일은 아래 여러 가지 방법중 한가지 방법을 이용하여 설정할 수 있으며, 우선 순위대로 검색되는 구성 파일으로 적용되어집니다.
– ANSIBLE_CONFIG (환경변수)
– ansible.cfg (현재 디렉토리)
– ~/.ansible.cfg (홈디렉토리)
– /etc/ansible/ansible.cfg
디렉토리가 바뀌어도 항상 적용이 가능하도록 세번째 방법으로 설정해보겠습니다.


# vi ~/.ansible.cfg
[defaults]
forks = 10
아래는 중요하거나 자주 사용하는 옵션입니다. 모두 [default] 섹션에 넣어주면 됩니다.
– remote_user
: 원격 호스트에 연결할 때 사용할 SSH 사용자 이름을 지정합니다. 기본값은 현재 사용자의 이름입니다. 이 옵션을 설정하여 명시적으로 원격 사용자를 지정할 수 있습니다.
예) remote_user = myuser
– private_key_file
: SSH 키 파일의 경로를 지정합니다. 이 옵션을 사용하여 사용자 지정 SSH 키 파일을 사용할 수 있습니다.
예) private_key_file = /path/to/ssh/keyfile
– inventory
: 인벤토리 파일의 경로를 지정합니다. 기본적으로 ansible.cfg 파일이 있는 디렉토리에서 inventory 파일을 검색하며, 이 옵션을 사용하여 사용자 정의 인벤토리 파일을 지정할 수 있습니다. 인벤토리 파일의 경로를 지정하면 ansible 명령 실행시 -i 옵션을 이용해 인벤토리 파일을 일일이 명시하지 않아도 됩니다.
예) inventory = /root/servers.ini

1.mysql 설치 .
이제 mysql 설치 해보겠습니다. 

# vi mysql.yaml


– name: Install MySQL and Configure Database
  hosts: dball
  become: yes
  tasks:
    – name: Install MySQL Server
      apt:
        name: mysql-server
        state: present

    – name: Start MySQL Service
      service:
        name: mysql
        state: started

    – name: Install python3-pymysql
      apt:
        name: python3-pymysql
        state: present

    – name: Change MySQL root password
      mysql_user:
        login_user: root
        login_password: ”
        name: root
        password: 12345678
        host: localhost
        login_unix_socket: /var/run/mysqld/mysqld.sock

    – name: Create a MySQL Database
      mysql_db:
        login_user: root
        login_password: 12345678
        name: vittoriodb
        state: present

    – name: Create a MySQL User
      mysql_user:
        login_user: root
        login_password: 12345678
        name: vittorio
        password: 12345678
        priv: vittoriodb.*:ALL

    – name: Create a MySQL User
      mysql_user:
        login_user: root
        login_password: 12345678
        name: replication
        password: 87654321
        priv: vittoriodb.*:ALL

    – name: Flush MySQL Privileges
      mysql_user:
        login_user: root
        login_password: 12345678
        name: vittorio
        host: localhost
        priv: “*.*:ALL,GRANT”
        append_privs: yes

    – name: Flush MySQL Privileges
      mysql_user:
        login_user: root
        login_password: 12345678
        name: vittorio
        host: ‘%’
        priv: “*.*:ALL,GRANT”
        append_privs: yes

    – name: Flush MySQL Privileges
      mysql_user:
        login_user: root
        login_password: 12345678
        name: replication
        host: ‘%’
        priv: “*.*:ALL,GRANT”
        append_privs: yes


# ansible-playbook -i servers.ini mysql.yaml

PLAY [Install MySQL and Configure Database] **************************************************************************

TASK [Gathering Facts] ***********************************************************************************************
ok: [10.101.0.3]
ok: [10.101.0.17]
ok: [10.101.0.23]

TASK [Install MySQL Server] ******************************************************************************************
changed: [10.101.0.17]
changed: [10.101.0.3]
changed: [10.101.0.23]

TASK [Start MySQL Service] *******************************************************************************************
ok: [10.101.0.17]
ok: [10.101.0.3]
ok: [10.101.0.23]

TASK [Install python3-pymysql] ***************************************************************************************
ok: [10.101.0.3]
ok: [10.101.0.23]
ok: [10.101.0.17]

TASK [Change MySQL root password] ************************************************************************************
[WARNING]: The value “********” (type int) was converted to “‘********'” (type string). If this does not look like
what you expect, quote the entire value to ensure it does not change.
changed: [10.101.0.17]
changed: [10.101.0.23]
changed: [10.101.0.3]

TASK [Create a MySQL Database] ***************************************************************************************
changed: [10.101.0.17]
changed: [10.101.0.23]
changed: [10.101.0.3]

TASK [Create a MySQL User] *******************************************************************************************
changed: [10.101.0.23]
changed: [10.101.0.3]
changed: [10.101.0.17]

TASK [Create a MySQL User] *******************************************************************************************
changed: [10.101.0.3]
changed: [10.101.0.23]
changed: [10.101.0.17]

TASK [Flush MySQL Privileges] ****************************************************************************************
changed: [10.101.0.3]
changed: [10.101.0.17]
changed: [10.101.0.23]

TASK [Flush MySQL Privileges] ****************************************************************************************
changed: [10.101.0.3]
changed: [10.101.0.17]
changed: [10.101.0.23]

TASK [Flush MySQL Privileges] ****************************************************************************************
changed: [10.101.0.3]
changed: [10.101.0.17]
changed: [10.101.0.23]

PLAY RECAP ***********************************************************************************************************
10.101.0.17                : ok=11   changed=8    unreachable=0    failed=0    skipped=0    rescued=0    ignored=0   
10.101.0.23                : ok=11   changed=8    unreachable=0    failed=0    skipped=0    rescued=0    ignored=0   
10.101.0.3                 : ok=11   changed=8    unreachable=0    failed=0    skipped=0    rescued=0    ignored=0 

DB 접속해서 확인 

# mysql -u root -p
Enter password: 
Welcome to the MySQL monitor.  Commands end with ; or \g.
Your MySQL connection id is 16
Server version: 8.0.34-0ubuntu0.22.04.1 (Ubuntu)

Copyright (c) 2000, 2023, Oracle and/or its affiliates.

Oracle is a registered trademark of Oracle Corporation and/or its
affiliates. Other names may be trademarks of their respective
owners.

Type ‘help;’ or ‘\h’ for help. Type ‘\c’ to clear the current input statement.

mysql> use mysql;
Reading table information for completion of table and column names
You can turn off this feature to get a quicker startup with -A

Database changed
mysql> select user, host from user;
+——————+———–+
| user             | host      |
+——————+———–+
| replication      | %         |
| vittorio         | %         |
| debian-sys-maint | localhost |
| mysql.infoschema | localhost |
| mysql.session    | localhost |
| mysql.sys        | localhost |
| replication      | localhost |
| root             | localhost |
| vittorio         | localhost |
+——————+———–+
9 rows in set (0.00 sec)


mysql> status;
————–
mysql  Ver 8.0.34-0ubuntu0.22.04.1 for Linux on x86_64 ((Ubuntu))

Connection id: 16
Current database: mysql
Current user: root@localhost
SSL: Not in use
Current pager: stdout
Using outfile: ”
Using delimiter: ;
Server version: 8.0.34-0ubuntu0.22.04.1 (Ubuntu)
Protocol version: 10
Connection: Localhost via UNIX socket
Server characterset: utf8mb4
Db     characterset: utf8mb4
Client characterset: utf8mb4
Conn.  characterset: utf8mb4
UNIX socket: /var/run/mysqld/mysqld.sock
Binary data as: Hexadecimal
Uptime: 14 min 17 sec

Threads: 2  Questions: 103  Slow queries: 0  Opens: 287  Flush tables: 3  Open tables: 206  Queries per second avg: 0.120
————–


디비 시작 , 스톱 파일 
#vi mysql_status.yaml


– name: Start Apache Web Server
  hosts: dball
  become: yes
  tasks:
    – name: Ensure Apache service is running
      service:
        name: mysql
        state: stopped  #  << 정지 
        #state: started       << 시작 

#  ansible-playbook -i servers.ini mysql.yaml

my.cnf 파일 배포 

저같은 경우에는 미리 my.cnf 파일을 host-node에 저장해두었습니다. 


# vi mycnf_copy.yaml


– name: Copy files to remote servers
  hosts: db1:db2:db3
  tasks:
    – name: Copy my.cnf to db1
      copy:
        src: /root/master/my.cnf
        dest: /etc/mysql/mysql.conf.d/mysqld.cnf
      delegate_to: “{{ item }}”
      with_items: “{{ groups[‘db1’] }}”

    – name: Copy my.cnf to db2
      copy:
        src: /root/slave2/my.cnf
        dest: /etc/mysql/mysql.conf.d/mysqld.cnf
      delegate_to: “{{ item }}”
      with_items: “{{ groups[‘db2’] }}”

    – name: Copy my.cnf to db3
      copy:
        src: /root/slave3/my.cnf
        dest: /etc/mysql/mysql.conf.d/mysqld.cnf
      delegate_to: “{{ item }}”
      with_items: “{{ groups[‘db3’] }}”


# ansible-playbook -i servers.ini mycnf_copy.yaml
디비 켜기
#vi mysql_status.yaml


– name: Start Apache Web Server
  hosts: dball
  become: yes
  tasks:
    – name: Ensure Apache service is running
      service:
        name: mysql
        #state: stopped  #  << 정지 
        state: started   #    << 시작 
#  ansible-playbook -i servers.ini mysql.yaml

2.mysql replicaiton 설정.
3개의 서버 에서 server_id값 확인하기  이때는 간단하게 서버에서 확인하였습니다. 

mysql> SHOW VARIABLES LIKE ‘server_id’;
+—————+——-+
| Variable_name | Value |
+—————+——-+
| server_id     | 1     |
+—————+——-+
1 row in set (0.01 sec)

mysql> SHOW VARIABLES LIKE ‘server_id’;
+—————+——-+
| Variable_name | Value |
+—————+——-+
| server_id     | 2     |
+—————+——-+
1 row in set (0.00 sec)

mysql> SHOW VARIABLES LIKE ‘server_id’;
+—————+——-+
| Variable_name | Value |
+—————+——-+
| server_id     | 3     |
+—————+——-+
1 row in set (0.00 sec)

마스터 값 불러오기 

# vi status.yaml

– name: Check MySQL Replication Status
  hosts: db1
  tasks:
    – name: Get master binlog file name and binlog position
      community.mysql.mysql_replication:
        mode: getmaster
      become: yes
      register: replication_status

    – name: Display Replication Status
      debug:
        var: replication_status

# ansible-playbook -i servers.ini status.yaml 
PLAY [Check MySQL Replication Status] ********************************************************************************

TASK [Gathering Facts] ***********************************************************************************************
ok: [10.101.0.3]

TASK [Get master binlog file name and binlog position] ***************************************************************
ok: [10.101.0.3]

TASK [Display Replication Status] ************************************************************************************
ok: [10.101.0.3] => {
    “replication_status”: {
        “Binlog_Do_DB”: “”,
        “Binlog_Ignore_DB”: “”,
        “Executed_Gtid_Set”: “”,
        “File”: “binlog.000005“,
        “Is_Master”: true,
        “Position”: 157,
        “changed”: false,
        “failed”: false,
        “queries”: []
    }
}

PLAY RECAP ***********************************************************************************************************
10.101.0.3                 : ok=3    changed=0    unreachable=0    failed=0    skipped=0    rescued=0    ignored=0

slave 서버들에게 리플리케이션 

# vi mysql_replication_slave.yaml

– name: Configure MySQL Replication on Slave Servers
  hosts: db2, db3
  become: yes
  tasks:
    – name: Start MySQL replication on slave servers
      mysql_replication:
        mode: changemaster
        master_host: “10.101.0.3
        master_user: “replication
        master_password: “87654321
        master_log_file: “binlog.000005″
        master_log_pos: 157
      notify: Restart MySQL Service

  handlers:
  – name: Restart MySQL Service
    service:
      name: mysql
      state: restarted

# ansible-playbook -i servers.ini mysql_replication_slave.yaml

리플리케이션 완료 

3.모니터링 방법 2가지 .

slave 서버들이 정상적인지 확인하는 방법 2가지 

1. running 값들이  yes 인지  
             Slave_IO_Running: Yes
            Slave_SQL_Running: Yes
2. 특정 데이터 테이블에 카운트 수 조회 

1.

# vi check_replication.yaml


– name: Check MySQL Replication Status
  hosts: db2, db3  # 마스터와 슬레이브 서버의 그룹을 여기에 지정합니다.
  become: yes
  tasks:
    – name: Get replication status from MySQL
      shell: “mysql -u root -p12345678 -e ‘SHOW SLAVE STATUS\\G’ | grep ‘Running:'”
      register: replication_status
      changed_when: false
      ignore_errors: yes
      tags: replication_status

    – name: Display Replication Status
      debug:
        var: replication_status.stdout_lines
      when: replication_status.rc == 0
      tags: replication_status

# ansible-playbook -i servers.ini check_replication.yaml 

PLAY [Check MySQL Replication Status] ********************************************************************************

TASK [Gathering Facts] ***********************************************************************************************
ok: [10.101.0.23]
ok: [10.101.0.17]

TASK [Get replication status from MySQL] *****************************************************************************
ok: [10.101.0.17]
ok: [10.101.0.23]

TASK [Display Replication Status] ************************************************************************************
ok: [10.101.0.23] => {
    “replication_status.stdout_lines”: [
        ”             Slave_IO_Running: Yes”,
        ”            Slave_SQL_Running: Yes”
    ]
}
ok: [10.101.0.17] => {
    “replication_status.stdout_lines”: [
        ”             Slave_IO_Running: Yes”,
        ”            Slave_SQL_Running: Yes”
    ]
}

PLAY RECAP ***********************************************************************************************************
10.101.0.17                : ok=3    changed=0    unreachable=0    failed=0    skipped=0    rescued=0    ignored=0   
10.101.0.23                : ok=3    changed=0    unreachable=0    failed=0    skipped=0    rescued=0    ignored=0 

2.

# vi check_mysql_count.yaml

– name: Check Record Count in MySQL Table
  hosts: db1, db2, db3  # 마스터와 슬레이브 서버의 그룹을 여기에 지정합니다.
  become: yes
  tasks:
    – name: Get record count from MySQL table
      shell: “mysql -u root -p12345678 -e ‘SELECT COUNT(*) FROM mysql.user;'”
      register: record_count
      changed_when: false
      ignore_errors: yes
      tags: record_count

    – name: Display Record Count
      debug:
        var: record_count.stdout_lines
      when: record_count.rc == 0
      tags: record_count


# ansible-playbook -i servers.ini check_mysql_count.yaml 

PLAY [Check Record Count in MySQL Table] *****************************************************************************

TASK [Gathering Facts] ***********************************************************************************************
ok: [10.101.0.17]
ok: [10.101.0.3]
ok: [10.101.0.23]

TASK [Get record count from MySQL table] *****************************************************************************
ok: [10.101.0.17]
ok: [10.101.0.23]
ok: [10.101.0.3]

TASK [Display Record Count] ******************************************************************************************
ok: [10.101.0.3] => {
    “record_count.stdout_lines”: [
        “COUNT(*)”,
        “9”
    ]
}
ok: [10.101.0.23] => {
    “record_count.stdout_lines”: [
        “COUNT(*)”,
        “9”
    ]
}
ok: [10.101.0.17] => {
    “record_count.stdout_lines”: [
        “COUNT(*)”,
        “9”
    ]
}

PLAY RECAP ***********************************************************************************************************
10.101.0.17                : ok=3    changed=0    unreachable=0    failed=0    skipped=0    rescued=0    ignored=0   
10.101.0.23                : ok=3    changed=0    unreachable=0    failed=0    skipped=0    rescued=0    ignored=0   
10.101.0.3                 : ok=3    changed=0    unreachable=0    failed=0    skipped=0    rescued=0    ignored=0 


이러한 결과 값들을 텔레그램,웹 으로 모니터링 할 수 있습니다. 

저는 python과 flask 로  했습니다. 

# apt install python3-pip
# pip3 install flask

#vi app.py
app = Flask(__name__)

@app.route(‘/’)
def index():
    replication_status = read_file(‘/var/www/html/replication_status.txt’)
    record_count = read_file(‘/var/www/html/record_count.txt’)
    return f'<h1>Replication Status</h1><pre>{replication_status}</pre><h1>Record Count</h1><pre>{record_count}</pre>’

def read_file(file_path):
    try:
        with open(file_path, ‘r’) as file:
            content = file.read()
        return content
    except Exception as e:
        return str(e)

if __name__ == ‘__main__’:
    app.run(host=’0.0.0.0′, port=5000)

백그라운드로 실행 

# nohup python3 app.py > /dev/null 2>&1 &


# netstat -nltp
Active Internet connections (only servers)
Proto Recv-Q Send-Q Local Address           Foreign Address         State       PID/Program name    
tcp        0      0 0.0.0.0:5000            0.0.0.0:*               LISTEN      69512/python3       
tcp        0      0 0.0.0.0:22              0.0.0.0:*               LISTEN      6543/sshd: /usr/sbi 
tcp        0      0 127.0.0.53:53           0.0.0.0:*               LISTEN      1793/systemd-resolv 
tcp6       0      0 :::22                   :::*                    LISTEN      6543/sshd: /usr/sbi 
tcp6       0      0 :::80                   :::*                    LISTEN      31756/apache2    


정상작동 ip:50000 으로 확인가능 


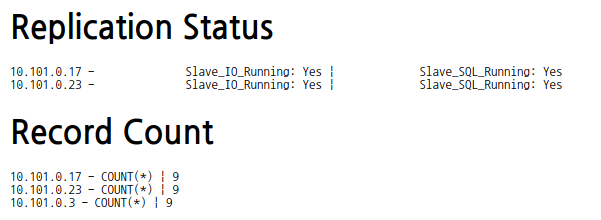
리플리케이션이 정상인지 중요한 데이터베이스 테이블 카운트 조회로 데이터가 일치하는지 확인할수 있습니다.
물론 지속적으로 확인할려면 crontab 에 등록하여 5,10,30,60분 등을 등록하여 실시간 모니터링 할수있습니다.
ansible 로 구축하기 완료 입니다. 감사합니다. 


Subscribe
Notify of
guest
0 Comments
Inline Feedbacks
View all comments
0
Would love your thoughts, please comment.x
()
x