“PostgreSQL 14.x Install”
PostgreSQL는 The PostgreSQL Global Development Group에서 개발하는 오픈 소스 ORDBMS 입니다.
이 포스트에서는 CentOS7에서 Postgresql 14.x를 설치하는 방법을 소개합니다.
|
[개 요] ✅ 종 류 : 프로그램 /툴 소개 / 설치 ✅ 난이도 : ⭐ ✅ 내용요약 : Postgresql 14.x 설치 ✅ 테스트환경 : CentOS7 ✅ 관련직무 : 시스템&클라우드 엔지니어 |
|
[기초이론&용어설명]
|
|
[관련 기술자료] |
“Stress Tool 설치 & 테스트”
1️⃣ Stress Tool 설치
안녕하세요 본 게시글에서는 CentOS7에 Postgresql 14.x를 설치해보겠습니다.
기본적으로 yum update가 완료된 상황에서 진행해야 하며, 이후 레포를 추가하여 한 번 더 update를 진행합니다.
“기본 세팅”
1️⃣ Selinux 해제
selinux는 /etc/selinux/config 파일에 선언되어 있으며, 아래 명령어로 현재 상태를 확인 가능합니다.
| cat /etc/selinux/config | grep ‘SELINUX=’ | tail -n 1 === SELINUX=enforcing === |
ecforcing은 selinux 활성화, disable은 비활성화를 의미합니다.
설정 파일 변경 시 수동으로 vi 에디터 등을 통해 변경해도 되고 sed 명령어로 값을 변경해도 괜찮습니다. (sed -i ‘s%SELINUX=enforcing%SELINUX=disabled%g’ /etc/selinux/config)
selinux 설정은 변경 후 리부팅을 해야 적용이 원활하게 되지만,
리부팅을 동반하기 어려운 경우 설정 파일에서 값을 disable로 변경한 뒤 setenforce 명령어로 바로 적용할 수 있습니다.
단, 설정 파일 변경이 없이 setenforce로만 변경하여 사용한다면
추후 리부팅을 하면 값이 적용되지 않은 채로 부팅됩니다.
setenforce 명령어로 설정한 값은 getenforce로 확인할 수 있습니다.
|
✅ 비활성화 시 -> setenforce 0 입력 -> getenforce 시 Permissive 값 출력되면 적용 완료 ✅활성화 시 -> setenforce 1 입력 -> getenforce 시 Enforcing 값 출력되면 적용 완료 |
2️⃣ yum update
터미널이 꺼져도 명령어는 진행되도록 백그라운드 설정으로 실행할 수 있도록 조치합니다.
명령어는 아래와 같습니다.
| yum update -y 또는 nohup yum update -y & |
“추가 패키지 설치”
1️⃣ postgresql-server 버전 확인
기본적으로 install 되는 postgresql-server의 버전을 확인합니다.
yum info postgresql-server
===
Loaded plugins: fastestmirror
Loading mirror speeds from cached hostfile
* base: mirror.navercorp.com
* extras: mirror.navercorp.com
* updates: mirror.kakao.com
Available Packages
Name : postgresql-server
Arch : x86_64
Version : 9.2.24
Release : 8.el7_9
Size : 3.8 M
Repo : updates/7/x86_64
Summary : The programs needed to create and run a PostgreSQL server
URL : http://www.postgresql.org/
License : PostgreSQL
Description : PostgreSQL is an advanced Object-Relational database management system (DBMS).
: The postgresql-server package contains the programs needed to create
: and run a PostgreSQL server, which will in turn allow you to create
: and maintain PostgreSQL databases.
===
현재 15.x release까지 개발되었으나 9.x 버전으로 낮은 버전대가 기본 설치됨을 확인할 수 있습니다.
[release note URL] https://www.postgresql.org/docs/release/
2️⃣ postgresql repo 설치
14.8 버전을 다운로드하기 위해 rpm 형식 postgresql repo를 설치하겠습니다.
|
yum -y install https://download.postgresql.org/pub/repos/yum/reporpms/EL-7-x86_64/pgdg-redhat-repo-latest.noarch.rpm |
===
Loaded plugins: fastestmirror
pgdg-redhat-repo-latest.noarch.rpm | 8.6 kB 00:00:00
Examining /var/tmp/yum-root-sjxX1F/pgdg-redhat-repo-latest.noarch.rpm: pgdg-redhat-repo-42.0-32.noarch
Marking /var/tmp/yum-root-sjxX1F/pgdg-redhat-repo-latest.noarch.rpm to be installed
Resolving Dependencies
–> Running transaction check
—> Package pgdg-redhat-repo.noarch 0:42.0-32 will be installed
–> Finished Dependency Resolution
Dependencies Resolved
===============================================================================================
Package Arch Version Repository Size
===============================================================================================
Installing:
pgdg-redhat-repo noarch 42.0-32 /pgdg-redhat-repo-latest.noarch 13 k
Transaction Summary
===============================================================================================
Install 1 Package
Total size: 13 k
Installed size: 13 k
Downloading packages:
Running transaction check
Running transaction test
Transaction test succeeded
Running transaction
Installing : pgdg-redhat-repo-42.0-32.noarch 1/1
Verifying : pgdg-redhat-repo-42.0-32.noarch 1/1
Installed:
pgdg-redhat-repo.noarch 0:42.0-32
Complete!
===
3️⃣ repo 적용
다운로드한 repo를 적용해줍니다.
|
yum repolist -y |
===
Loaded plugins: fastestmirror
Loading mirror speeds from cached hostfile
* base: mirror.navercorp.com
* extras: mirror.navercorp.com
* updates: mirror.kakao.com
pgdg-common/7/x86_64/signature | 198 B 00:00:00
Retrieving key from file:///etc/pki/rpm-gpg/RPM-GPG-KEY-PGDG
Importing GPG key 0x442DF0F8:
Userid : “PostgreSQL RPM Building Project <pgsql-pkg-yum@postgresql.org>”
Fingerprint: 68c9 e2b9 1a37 d136 fe74 d176 1f16 d2e1 442d f0f8
Package : pgdg-redhat-repo-42.0-32.noarch (@/pgdg-redhat-repo-latest.noarch)
From : /etc/pki/rpm-gpg/RPM-GPG-KEY-PGDG
pgdg-common/7/x86_64/signature | 2.9 kB 00:00:00 !!!
pgdg11/7/x86_64/signature | 198 B 00:00:00
Retrieving key from file:///etc/pki/rpm-gpg/RPM-GPG-KEY-PGDG
Importing GPG key 0x442DF0F8:
Userid : “PostgreSQL RPM Building Project <pgsql-pkg-yum@postgresql.org>”
Fingerprint: 68c9 e2b9 1a37 d136 fe74 d176 1f16 d2e1 442d f0f8
Package : pgdg-redhat-repo-42.0-32.noarch (@/pgdg-redhat-repo-latest.noarch)
From : /etc/pki/rpm-gpg/RPM-GPG-KEY-PGDG
pgdg11/7/x86_64/signature | 3.6 kB 00:00:00 !!!
pgdg12/7/x86_64/signature | 198 B 00:00:00
Retrieving key from file:///etc/pki/rpm-gpg/RPM-GPG-KEY-PGDG
Importing GPG key 0x442DF0F8:
Userid : “PostgreSQL RPM Building Project <pgsql-pkg-yum@postgresql.org>”
Fingerprint: 68c9 e2b9 1a37 d136 fe74 d176 1f16 d2e1 442d f0f8
Package : pgdg-redhat-repo-42.0-32.noarch (@/pgdg-redhat-repo-latest.noarch)
From : /etc/pki/rpm-gpg/RPM-GPG-KEY-PGDG
pgdg12/7/x86_64/signature | 3.6 kB 00:00:00 !!!
pgdg13/7/x86_64/signature | 198 B 00:00:00
Retrieving key from file:///etc/pki/rpm-gpg/RPM-GPG-KEY-PGDG
Importing GPG key 0x442DF0F8:
Userid : “PostgreSQL RPM Building Project <pgsql-pkg-yum@postgresql.org>”
Fingerprint: 68c9 e2b9 1a37 d136 fe74 d176 1f16 d2e1 442d f0f8
Package : pgdg-redhat-repo-42.0-32.noarch (@/pgdg-redhat-repo-latest.noarch)
From : /etc/pki/rpm-gpg/RPM-GPG-KEY-PGDG
pgdg13/7/x86_64/signature | 3.6 kB 00:00:00 !!!
pgdg14/7/x86_64/signature | 198 B 00:00:00
Retrieving key from file:///etc/pki/rpm-gpg/RPM-GPG-KEY-PGDG
Importing GPG key 0x442DF0F8:
Userid : “PostgreSQL RPM Building Project <pgsql-pkg-yum@postgresql.org>”
Fingerprint: 68c9 e2b9 1a37 d136 fe74 d176 1f16 d2e1 442d f0f8
Package : pgdg-redhat-repo-42.0-32.noarch (@/pgdg-redhat-repo-latest.noarch)
From : /etc/pki/rpm-gpg/RPM-GPG-KEY-PGDG
pgdg14/7/x86_64/signature | 3.6 kB 00:00:00 !!!
pgdg15/7/x86_64/signature | 198 B 00:00:00
Retrieving key from file:///etc/pki/rpm-gpg/RPM-GPG-KEY-PGDG
Importing GPG key 0x442DF0F8:
Userid : “PostgreSQL RPM Building Project <pgsql-pkg-yum@postgresql.org>”
Fingerprint: 68c9 e2b9 1a37 d136 fe74 d176 1f16 d2e1 442d f0f8
Package : pgdg-redhat-repo-42.0-32.noarch (@/pgdg-redhat-repo-latest.noarch)
From : /etc/pki/rpm-gpg/RPM-GPG-KEY-PGDG
pgdg15/7/x86_64/signature | 3.6 kB 00:00:00 !!!
(1/11): pgdg12/7/x86_64/group_gz | 245 B 00:00:01
(2/11): pgdg11/7/x86_64/group_gz | 245 B 00:00:01
(3/11): pgdg13/7/x86_64/group_gz | 246 B 00:00:00
(4/11): pgdg14/7/x86_64/group_gz | 244 B 00:00:00
(5/11): pgdg-common/7/x86_64/primary_db | 179 kB 00:00:01
(6/11): pgdg15/7/x86_64/group_gz | 246 B 00:00:00
(7/11): pgdg12/7/x86_64/primary_db | 381 kB 00:00:02
(8/11): pgdg15/7/x86_64/primary_db | 114 kB 00:00:00
(9/11): pgdg13/7/x86_64/primary_db | 299 kB 00:00:01
(10/11): pgdg14/7/x86_64/primary_db | 204 kB 00:00:00
(11/11): pgdg11/7/x86_64/primary_db | 496 kB 00:00:03
repo id repo name status
base/7/x86_64 CentOS-7 – Base 10,072
extras/7/x86_64 CentOS-7 – Extras 515
pgdg-common/7/x86_64 PostgreSQL common RPMs for RHEL / CentOS 7 – x86_64 429
pgdg11/7/x86_64 PostgreSQL 11 for RHEL / CentOS 7 – x86_64 1,514
pgdg12/7/x86_64 PostgreSQL 12 for RHEL / CentOS 7 – x86_64 1,145
pgdg13/7/x86_64 PostgreSQL 13 for RHEL / CentOS 7 – x86_64 896
pgdg14/7/x86_64 PostgreSQL 14 for RHEL / CentOS 7 – x86_64 630
pgdg15/7/x86_64 PostgreSQL 15 for RHEL / CentOS 7 – x86_64 337
updates/7/x86_64 CentOS-7 – Updates 4,996
repolist: 20,534
===
이제 보다 다채로운 버전의 postgresql을 설치할 수 있습니다.
4️⃣ yum update
yum update를 통해 적용합니다.
|
yum -y update |
“postgresql 14.x 다운로드”
1️⃣ 패키지 다운로드
명령어로 다운로드 합니다. 패키지는 postgresql14-server와 postgresql14 입니다.
|
yum install postgresql14-server postgresql14 |
===
Loaded plugins: fastestmirror
Loading mirror speeds from cached hostfile
* base: mirror.navercorp.com
* extras: mirror.navercorp.com
* updates: mirror.kakao.com
Resolving Dependencies
–> Running transaction check
—> Package postgresql14.x86_64 0:14.8-1PGDG.rhel7 will be installed
–> Processing Dependency: postgresql14-libs(x86-64) = 14.8-1PGDG.rhel7 for package: postgresql14-14.8-1PGDG.rhel7.x86_64
–> Processing Dependency: libicu for package: postgresql14-14.8-1PGDG.rhel7.x86_64
–> Processing Dependency: libpq.so.5()(64bit) for package: postgresql14-14.8-1PGDG.rhel7.x86_64
—> Package postgresql14-server.x86_64 0:14.8-1PGDG.rhel7 will be installed
–> Running transaction check
—> Package libicu.x86_64 0:50.2-4.el7_7 will be installed
—> Package postgresql14-libs.x86_64 0:14.8-1PGDG.rhel7 will be installed
–> Finished Dependency Resolution
Dependencies Resolved
===============================================================================================
Package Arch Version Repository Size
===============================================================================================
Installing:
postgresql14 x86_64 14.8-1PGDG.rhel7 pgdg14 1.5 M
postgresql14-server x86_64 14.8-1PGDG.rhel7 pgdg14 5.4 M
Installing for dependencies:
libicu x86_64 50.2-4.el7_7 base 6.9 M
postgresql14-libs x86_64 14.8-1PGDG.rhel7 pgdg14 271 k
Transaction Summary
===============================================================================================
Install 2 Packages (+2 Dependent packages)
Total download size: 14 M
Installed size: 55 M
Is this ok [y/d/N]: y
Downloading packages:
(1/4): libicu-50.2-4.el7_7.x86_64.rpm | 6.9 MB 00:00:00
warning: /var/cache/yum/x86_64/7/pgdg14/packages/postgresql14-libs-14.8-1PGDG.rhel7.x86_64.rpm: Header V4 DSA/SHA1 Signature, key ID 442df0f8: NOKEY
Public key for postgresql14-libs-14.8-1PGDG.rhel7.x86_64.rpm is not installed
(2/4): postgresql14-libs-14.8-1PGDG.rhel7.x86_64.rpm | 271 kB 00:00:02
(3/4): postgresql14-14.8-1PGDG.rhel7.x86_64.rpm | 1.5 MB 00:00:03
(4/4): postgresql14-server-14.8-1PGDG.rhel7.x86_64.rpm | 5.4 MB 00:00:04
———————————————————————————————————————
Total 2.1 MB/s | 14 MB 00:00:06
Retrieving key from file:///etc/pki/rpm-gpg/RPM-GPG-KEY-PGDG
Importing GPG key 0x442DF0F8:
Userid : “PostgreSQL RPM Building Project <pgsql-pkg-yum@postgresql.org>”
Fingerprint: 68c9 e2b9 1a37 d136 fe74 d176 1f16 d2e1 442d f0f8
Package : pgdg-redhat-repo-42.0-32.noarch (@/pgdg-redhat-repo-latest.noarch)
From : /etc/pki/rpm-gpg/RPM-GPG-KEY-PGDG
Is this ok [y/N]: y
Running transaction check
Running transaction test
Transaction test succeeded
Running transaction
Installing : postgresql14-libs-14.8-1PGDG.rhel7.x86_64 1/4
Installing : libicu-50.2-4.el7_7.x86_64 2/4
Installing : postgresql14-14.8-1PGDG.rhel7.x86_64 3/4
Installing : postgresql14-server-14.8-1PGDG.rhel7.x86_64 4/4
Verifying : libicu-50.2-4.el7_7.x86_64 1/4
Verifying : postgresql14-server-14.8-1PGDG.rhel7.x86_64 2/4
Verifying : postgresql14-14.8-1PGDG.rhel7.x86_64 3/4
Verifying : postgresql14-libs-14.8-1PGDG.rhel7.x86_64 4/4
Installed:
postgresql14.x86_64 0:14.8-1PGDG.rhel7 postgresql14-server.x86_64 0:14.8-1PGDG.rhel7
Dependency Installed:
libicu.x86_64 0:50.2-4.el7_7 postgresql14-libs.x86_64 0:14.8-1PGDG.rhel7
Complete!
===
2️⃣ 버전확인
설치 버전을 확인하며 다운로드하기 위해 -y 옵션을 제외하고 명령어를 입력했습니다
설치 후 rpm으로 확인 시 아래와 같이 입력하여 버전 확인이 가능합니다.
| rpm -qa | grep postgresql14 |
===
postgresql14-server-14.8-1PGDG.rhel7.x86_64
postgresql14-libs-14.8-1PGDG.rhel7.x86_64
postgresql14-14.8-1PGDG.rhel7.x86_64
===
rpm -qi postgresql14-server
===
Name : postgresql14-server
Version : 14.8
Release : 1PGDG.rhel7
Architecture: x86_64
Install Date: 2023년 06월 07일 (수) 오전 11시 55분 31초
Group : Unspecified
Size : 23398268
License : PostgreSQL
Signature : DSA/SHA1, 2023년 05월 11일 (목) 오전 05시 33분 57초, Key ID 1f16d2e1442df0f8
Source RPM : postgresql14-14.8-1PGDG.rhel7.src.rpm
Build Date : 2023년 05월 11일 (목) 오전 03시 13분 30초
Build Host : koji-centos7-x86-64-pgbuild
Relocations : (not relocatable)
Vendor : PostgreSQL Global Development Group
URL : https://www.postgresql.org/
Summary : The programs needed to create and run a PostgreSQL server
Description :
PostgreSQL is an advanced Object-Relational database management system (DBMS).
The postgresql14-server package contains the programs needed to create
and run a PostgreSQL server, which will in turn allow you to create
and maintain PostgreSQL databases.
===
rpm 질의 시 -q(query)를 통해 확인할 수 있으며, a 옵션을 넣으면 모든 패키지를 i 옵션을 넣으면 자세한 정보(info)를 확인할 수 있습니다.
육안으로 보기에는 i 옵션이 좋으나 확실한 패키지명이 불확실한 경우 a 옵션을 활용합니다.
“postgresql 설치 후 설정”
- postgresql initialize
- /usr/pgsql-14/bin/postgresql-14-setup initdb
===
Initializing database … OK
===
리부팅 후에도 자동 재실행이 될 수 있도록 enable 설정 및 start로 실행합니다.
|
systemctl start postgresql-14 && systemctl enable postgresql-14 |
===
Created symlink from /etc/systemd/system/multi-user.target.wants/postgresql-14.service to /usr/lib/systemd/system/postgresql-14.service.
===
postgresql 기본 포트는 tcp 5432 이며 pname은 postmaster입니다. netstat 으로 잘 올라왔는지 확인합니다.
|
netstat -nltp | grep 5432 |
===
tcp 0 0 127.0.0.1:5432 0.0.0.0:* LISTEN 2325/postmaster
tcp6 0 0 ::1:5432 :::* LISTEN 2325/postmaster
===
이제 접속해서 비밀번호를 세팅해줍니다.
초기 접속 방법은 데몬 권한을 가지고 있는 postgres 유저로 전환하여 psql 접속 후 쿼리로 변경하면 됩니다.
|
cat /etc/passwd | grep postgres === ===
=== |
psql (14.8)
Type “help” for help.
postgres=# // 이 부분이 쿼리 입력기 부분입니다.
===
비밀번호 변경 쿼리는 alter user postgres with password ‘비밀번호 값’; 입니다.
쿼리가 정상적으로 수행되었다면 ALTER ROLE 이라는 문구가 출력됩니다.
이제 \q 로 종료하고 logout 혹은 exit로 postgres 접속 터미널을 종료합니다.

이 상태에서 바로 접속하면 에러가 발생합니다.
![]()
인증 부분 에러로 ipv4 설정에 대해 md5 방식으로 변경해주어야 합니다.
파일위치는 /var/lib/pgsql/14/data/pg_hba.conf 입니다.
설정 파일 내부 값의 설명은 공식 사이트 URL을 첨부하겠습니다.
[pg_hda.conf 설명 URL : https://www.postgresql.kr/docs/9.6/auth-pg-hba-conf.html]
=== # “local” is for Unix domain socket connections only === |
- 수정 전

- 수정 후

| systemctl restart postgresql-14 |
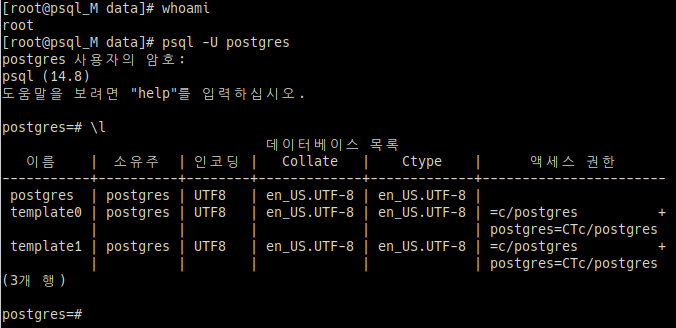
재시작을 하여 적용한 뒤 설정이 잘 되었는지 확인하기 위해 접속해보겠습니다.
딱히 지정할 DB가 없어 User만 입력해서 접속하겠습니다.
원칙적으로 생략 시 유저명과 같은 DB인 postgres database에 접속됩니다.
단, postgres는 superuser이므로 제한 없이 db접근이 가능한 계정입니다.
|
psql -U postgres === 비밀번호 입력 === \l = 데이터 베이스 목록 보기 |

이렇게 접속 및 database 목록 확인도 잘 됩니다.
이제 마지막으로 외부접근이 필요하다면 방화벽 허용 및 외부에서 사용할 계정이 필요하면 계정을 생성해주면 됩니다.
방화벽은 서버 환경마다 상이하니 따로 기재하지 않겠습니다.
새로운 계정 추가는 postgresql에 접속한 계정이 롤 만들기가 가능해야 합니다. postgres 계정으로 하는 것을 권유드리며,
만일 접속한 계정의 권한 확인을 원한다면 \du 또는 \du 계정명(롤이름) 으로 확인 가능합니다.

새로운 계정 추가는 아래 명령어로 생성 가능합니다.
|
create user 유저명 with password ‘비밀번호 값’; |
![]()
정상적으로 쿼리가 수행되었다면 CREATE ROLE 이라는 문구가 출력됩니다.
만일 계정을 생성함과 동시에 role(권한, 역할)을 부여하고 싶다면 with 뒤에 함께 기재하면 됩니다.
계정 생성 및 비밀번호 값이 잘 입력되었는지 확인합니다.
|
\du = 계정과 권한 보기 |

|
select * from pg_shadow; = 계정의 권한여부와 비밀번호 값 입력 여부 확인 |

이제 계정이 추가되었음을 확인했습니다.
다만, 아무런 권한이 없기 때문에 지정된 database도 없어 로그인은 불가한 상태입니다.
권한에는 여러 종류가 있지만 postgres와 동일한 권한을 부여해보겠습니다.
현재 postgres 계정이 가진 권한은 아래와 같습니다.
슈퍼유저 = Superuser, 롤 만들기 = Create role, DB 만들기 = Create DB, 복제 = Replication, RLS 통과 = Bypass RLS
계정의 권한 수정은 alter user 계정명 부여할권한1 부여할권한2; 형식으로 입력합니다. 띄어쓰기로 권한 명을 구분하므로 주의합니다.
|
alter user smiletest Superuser Createrole CreateDB Replication BypassRLS; |

잘 변경되었습니다.
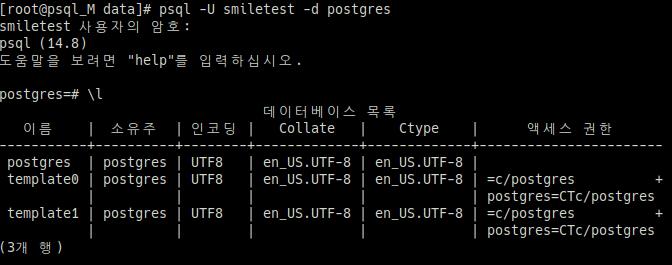
이제 종료하고 smiletest 계정으로 postgres db에 접속하여 테스트 해봅니다.

잘 접속됩니다.
이상 마치겠습니다.