


Ceph 는 분산 저장 시스템으로, 대규모 데이터를 안정적이고 확장 가능하게 저장하고 관리할 수 있는 오픈 소스 소프트웨어입니다. 객체 스토리지, 블록 스토리지 등을 제공하여 데이터의 저장및 관리가 용이하며, 다수의 노드에 걸쳐 데이터를 분산시켜 안정성을 확보하는것이 특징입니다.
Ceph-Ansible은 Ceph 클러스터를 구축하고 유지보수하기 위한 도구입니다. yaml 파일형식을 사용하여 다수의 서버를 설정하고 관리할 수 있는 오픈 소스 도구이며 이를 사용해 빠르고 효율적으로 Ceph 클러스터를 배포할 수 있습니다.
Ceph 구성요소
-
Monitor (mon):
- Monitor는 클러스터 상태와 매핑 정보를 유지하고 다른 Ceph 데몬과의 상호 작용합니다. 고가용성 구성을 위해 최소 3개의 Monitor가 필요합니다.
-
Manager (mgr):
- Manager는 클러스터의 상태, 성능 통계 및 모니터링 정보를 수집하고 표시합니다.
-
Object Storage Daemon (OSD):
- 클러스터의 실제 데이터를 저장하고 관리합니다. 데이터를 분산 저장하고, 복제 및 데이터 회복을 담당하여 데이터의 안정성과 가용성을 보장합니다.
- OSD 디스크 수는 최소 3의 배수로 설정하는 것이 좋습니다.
-
RADOS (Reliable Autonomic Distributed Object Store):
- RADOS는 Ceph의 기본 저장 시스템으로, 객체를 분산하여 저장하고 관리합니다. Ceph 클러스터의 핵심 기술이며, 여러 OSD에 데이터를 분산하여 안정성과 확장성을 제공합니다.
-
CephFS (Ceph File System):
- CephFS는 Ceph의 파일 시스템으로, 분산된 클라우드 환경에서 파일을 공유하고 관리할 수 있는 기능을 제공합니다.
준비사항
아래와 같은 하드웨어 자원으로 테스트를 진행 할 예정입니다. 테스트를 위한 하드웨어 구성이고, 실제 사용에는 무리가 있습니다.
Enviroment Setting
| Disk | public_network | cluster_network | |
| node0 (deploy_server) | /dev/vdb 50GB /dev/vdc 50GB /dev/vdd 50GB |
10.101.0.14 | 10.101.0.14 |
| node1 | /dev/vdb 50GB /dev/vdc 50GB /dev/vdd 50GB |
10.101.0.4 | 10.101.0.4 |
| node2 | /dev/vdb 50GB /dev/vdc 50GB /dev/vdd 50GB |
10.101.0.15 | 10.101.0.15 |
- OS : ubuntu22.04 jammy
- ceph-ansible : stable-6.0
- ceph : pacific
배포 서버는 따로 구성하는것이 좋지만 하드웨어 자원의 부족으로 node0 에서 ceph-ansible을 통하여 배포를 진행할 예정입니다.
각 서버에서는 아래 순서를 따라서 기본적인 환경설정을 진행합니다.
## 호스트 이름 설정 (node0, node1, node2)
$ hostnamectl set-hostname $hostname

## selinux 비활성화
$ vim /etc/selinux/config
1  # This file controls the state of SELinux on the system.
2  # SELINUX= can take one of these three values:
3  #     enforcing - SELinux security policy is enforced.
4  #     permissive - SELinux prints warnings instead of enforcing.
5  #     disabled - No SELinux policy is loaded.
6  SELINUX=enforcing -> disabled(변경)
7  # SELINUXTYPE= can take one of three values:
8  #     targeted - Targeted processes are protected,
9  #     minimum - Modification of targeted policy. Only selected processes are protected.
10 #     mls - Multi Level Security protection.
11 SELINUXTYPE=targeted

## 방화벽 및 포트 설정
# firewalld 또는 iptables 를 종료하거나,
# 80/tcp 2003/tcp 4505/tcp 4506/tcp 6800 7300/tcp 6789/tcp 8443/tcp 9100/tcp 9283/tcp 3000/tcp 9092/tcp 9093/tcp 9094/tcp 9094/udp 8080/tcp 포트에 대한 허용 규칙을 작성합니다.
# 본문에서는 방화벽을 사용하지 않습니다.
$ systemctl stop firewalld
$ systemctl disable firewalld
package 설치
ansible 은 ssh를 사용하여 배포를 진행하기에 ansible을 사용하기 위하여 최소 패키지 설치 및 호스트 등록을 진행합니다.
## node0(deploy) 패키지 설치
$ apt update
$ apt install python3 python3-pip sshpass

## /etc/hosts 등록
$ cat /etc/hosts
root@node0:~# cat /etc/hosts
127.0.0.1 localhost
10.101.0.14 node0
10.101.0.4 node1
10.101.0.15 node2

## 각 노드에 ssh-key 등록
$ ssh-keygen -N "" -f /root/.ssh/id_rsa
$ ssh-copy-id node0
$ ssh-copy-id node1
$ ssh-copy-id node2
VLAN 생성
네트워크 인터페이스가 1개 이기에 cluster_network 를 위하여 각 노드에 vip를 생성하여 사용합니다.
## node0
$ ifconfig ens3:1 192.168.102.2 netmask 255.255.255.0 up
## node1
$ ifconfig ens3:1 192.168.102.3 netmask 255.255.255.0 up
## node2
$ ifconfig ens3:1 192.168.102.4 netmask 255.255.255.0 up

## 또는 netplan 을 사용하여 아래와같은 서식으로 vlan을 생성하여 사용합니다.
vlans:
  vlan.2:
     id: 2
     link: ens3
     addresses: [ 192.168.102.2/24]
Ceph-ansible 다운로드
ceph-ansible은 git repository 를 통하여 공유되며 git clone을 사용하여 받아 올 수 있습니다.
git clone https://github.com/ceph/ceph-ansible.git
## node0(deploy)
$ cd ~
$ git clone https://github.com/ceph/ceph-ansible.git
$ cd ~/ceph-ansible/
$ git branch -a
~
remotes/origin/stable-2.1
remotes/origin/stable-2.2
remotes/origin/stable-3.0
remotes/origin/stable-3.1
remotes/origin/stable-3.2
remotes/origin/stable-4.0
remotes/origin/stable-5.0
remotes/origin/stable-6.0
remotes/origin/stable-6.0-ceph-volume-tests
remotes/origin/stable-7.0
~
$ git checkout stable-6.0
Switched to branch 'stable-6.0'
Your branch is up to date with 'origin/stable-6.0'.
ceph 배포를 위해서는 stable branch를 사용하여 배포를 진행하며, 각 버전마다 설치를 지원하는 ceph 버전이 다릅니다.
ceph-ansible-docs에서 확인 할 수 있는 지원하는 ceph 버전입니다.
stable-3.0Supports Ceph versionsjewelandluminous. This branch requires Ansible version2.4.stable-3.1Supports Ceph versionsluminousandmimic. This branch requires Ansible version2.4.stable-3.2Supports Ceph versionsluminousandmimic. This branch requires Ansible version2.6.stable-4.0Supports Ceph versionnautilus. This branch requires Ansible version2.9.stable-5.0Supports Ceph versionoctopus. This branch requires Ansible version2.9.stable-6.0Supports Ceph versionpacific. This branch requires Ansible version2.10.stable-7.0Supports Ceph versionquincy. This branch requires Ansible version2.12.mainSupports the main (devel) branch of Ceph. This branch requires Ansible version2.12.
배포하고 싶은 버전에 맞추어 branch를 변경하여 사용하면 됩니다. 필자는 quincy 를 사용하기위해 stable-7.0을 사용하였지만, 알수없는 코드상의 구문오류가 계속하여 발생하여 stable-6.0으로 pacific을 설치하였습니다.
Python-venv settings
ceph-ansible를 이용하여 ceph 배포를 위해서는 기본적으로 ansible, six, netaddr 등 의 패키지가 필요합니다. 필자는 다양한 ceph 버전을 테스트해보기위해 개별적인 환경을 구성할 수 없나 싶어서 이리저리 구글링을 하다가 얻은 팁입니다. python-venv를 사용하면 python 가상환경을 구성하여 사용할 수 있습니다. 해당 환경에 접속해 있는 경우에만 세팅된 환경을 사용할 수 있기에 다른 환경에 영향을 끼치지 않습니다. 아래와 같이 세팅후, ceph-ansible의 requierment.txt에 있는 내용을 설치합니다.
$ cd ~
$ python -m venv stable-6.0
$ source ~/stable-6.0/bin/activate # 가상환경 접속, deactivate 를 입력하면 종료됩니다.
(stable-6.0)$ cd ~/ceph-ansible
(stable-6.0)$ pip3 install -r requirement.txt # 필요한 패키지가 설치됩니다(ansible, netaddr, six)
혹여나 다른 버전을 테스트하고 싶다면 deactivate를 통하여 빠져나온뒤 새로운 venv를 생성하고 ceph-ansbile의 브랜치를 원하는 버전으로 변경 후, requierment를 새로 설치하면 됩니다. local 환경에 직접 설치할경우 버전 관리가 번거롭기에 여러 버전을 운용하기 유용한 방법입니다.
Ceph-ansible inventory 작성
각 노드의 호스트정보 및 역할을 작성하여야 합니다. 디렉토리 위치나 파일명은 상관없습니다.
$ cat inventory
[mons]
node0 ansible_host=10.101.0.14
node1 ansible_host=10.101.0.4
node2 ansible_host=10.101.0.15

[osds]
node0
node1
node2

[mgrs]
node0
node1
node2

[grafana-server]
node0

# mons, osds, mgrs, rgws 그룹을 묶어서 하나의 all 그룹으로 정의
# 아래와 같이 입력시 mons, osds, mgrs에 작성한 호스트가 all 그룹의 호스트로 정의됩니다.
[all:children]
mons
osds
mgrs
group_vars/all.yml 작성
사용할 네트워크, 설치할 ceph 버전, dashboard 설정등을 진행 할 수 있는 파일입니다.
필자는 아래와 같이 설정하여 사용하였습니다. ceph버전은 꼭 brach 버전과 맞추어 세팅하여야 합니다.
$ cp group_vars/all.yml.sample group_vars/all.yml
$ cat group_vars/all.yml

dummy:
cluster: ceph
ntp_service_enabled: true
ntp_daemon_type: chronyd

monitor_interface: ens3
  #monitor_address: 192.168.101.2 # octopus version 이후 불필요
public_network: 10.101.0.0/24
cluster_network: 10.101.0.0/24
ip_version: ipv4

containerized_deployment: true
ceph_docker_image: "ceph/daemon"
ceph_docker_image_tag: latest-pacific
ceph_docker_registry: docker.io
ceph_docker_registry_auth: false
ceph_client_docker_image: "{{ ceph_docker_image }}"
ceph_client_docker_image_tag: "{{ ceph_docker_image_tag }}"
ceph_client_docker_registry: "{{ ceph_docker_registry }}"

  # 로컬에 직접 설치를 원하면 아래 설정을 사용
  #ceph_mirror: https://download.ceph.com
  #ceph_stable_key: https://download.ceph.com/keys/release.asc
  #ceph_stable_release: quincy
  #ceph_stable_repo: "{{ ceph_mirror }}/debian-quincy"

# dashboard 설정
dashboard_enabled: True
dashboard_protocol: https
dashboard_port: 8443
dashboard_admin_user: admin
dashboard_admin_user_ro: false
dashboard_admin_password: p@assw0rd
grafana_admin_user: admin
grafana_admin_password: admin
group_vars/osds.yml 작성
osd 배포를 위해 사용할 디스크를 정의하는 파일입니다. 사용하고자 하는 디스크는 파티셔닝 되어있지 않은 깨끗한 디스크여야만 사용이 가능합니다.
$ cat group_vars/osds.yml
dummy:
osd_auto_discovery: false
osd_scenario: lvm
osd_objectstore: bluestore
devices:
  - /dev/vdb
  - /dev/vdc
  - /dev/vdd
lvm_volumes:
  - data: /dev/vdb
  - data: /dev/vdc
  - data: /dev/vdd
osd_auto_discovery – true로 사용하면 devices 를 정의하지 않아도 자동으로 devices 를 찾아 설치한다고 합니다. 비활성화로 진행합니다.
osd_scenario: lvm – 기본적으로 lvm을 파티션을 사용함으로 lvm 으로 파티셔닝 하도록 설정합니다.
osd_objectstore: bluestore
obj storage를 사용하기 위한 설정이라고 하는데.. 사실 아직 잘 모르겠습니다. 아래 링크에 설명이 잘 되어있는 듯 합니다.
https://www.ibm.com/docs/en/storage-ceph/5?topic=components-ceph-bluestore
devices, lvm_volumes 에서는 사용할 디스크를 정의합니다.
Deployment
$ cd ~/ceph-ansible/
$ ansible-playbook -i inventory site-container.yml.sample
명령어를 입력하면 ansible-playbook 을 통해 세팅된 정보에 따라서 배포가 진행됩니다.
혹여나 배포중 문제가 생기거나 중간에 취소되었다면 아래 명령어를 통하여 배포된 node를 초기화하고 새로 진행하면 됩니다.
$ ansible-playbook -i inventory infrastructure-playbooks/purge-container-cluster.yml
간혹 purge-container-cluster.yml 을 사용하더라도 lvm 은 정상적으로 삭제되지 않는경우가 있습니다, 해당경우에는 lvs 또는 lvmdiskscan 명령어로 활성화 되어있는 lvm 디스크를 확인하고 lvremove $디바이스명 명령어를 통하여 lvm 디스크를 삭제후 재배포 진행합니다.
ceph-ansible 의 task가 모두다 정상적으로 종료되었다면, 각 노드에서 docker 명령어를 통하여 배포된 컨테이너를 확인합니다.
## node0
$ docker ps
CONTAINER ID   IMAGE                        COMMAND                   CREATED          STATUS          PORTS     NAMES
faf8f5a2cb8e   grafana/grafana:6.7.4        "/run.sh"                 26 minutes ago   Up 26 minutes             grafana-server
740f6c4fa0d5   prom/prometheus:v2.7.2       "/bin/prometheus --c…"   32 minutes ago   Up 32 minutes             prometheus
6ca225e5605f   prom/alertmanager:v0.16.2    "/bin/alertmanager -…"   32 minutes ago   Up 32 minutes             alertmanager
913268b46a99   prom/node-exporter:v0.17.0   "/bin/node_exporter …"   33 minutes ago   Up 33 minutes             node-exporter
d419d8fe49d3   ceph/daemon:latest-pacific   "/opt/ceph-container…"   33 minutes ago   Up 33 minutes             ceph-osd-3
2179f191cb9c   ceph/daemon:latest-pacific   "/opt/ceph-container…"   33 minutes ago   Up 33 minutes             ceph-osd-0
cce8ff7ad886   ceph/daemon:latest-pacific   "/opt/ceph-container…"   35 minutes ago   Up 35 minutes             ceph-mgr-node0
c79447d4db87   ceph/daemon:latest-pacific   "/opt/ceph-container…"   36 minutes ago   Up 36 minutes             ceph-mon-node0

## node1
$ docker ps
CONTAINER ID   IMAGE                        COMMAND                   CREATED          STATUS          PORTS     NAMES
a1311404428d   prom/node-exporter:v0.17.0   "/bin/node_exporter …"   33 minutes ago   Up 33 minutes             node-exporter
2b6e9dd65411   ceph/daemon:latest-pacific   "/opt/ceph-container…"   34 minutes ago   Up 34 minutes             ceph-osd-5
84d2ed4ca50e   ceph/daemon:latest-pacific   "/opt/ceph-container…"   34 minutes ago   Up 34 minutes             ceph-osd-2
bb0c4af6651a   ceph/daemon:latest-pacific   "/opt/ceph-container…"   35 minutes ago   Up 35 minutes             ceph-mgr-node1
a1593bd9f46f   ceph/daemon:latest-pacific   "/opt/ceph-container…"   36 minutes ago   Up 36 minutes             ceph-mon-node1

## node2
$ docker ps
CONTAINER ID   IMAGE                        COMMAND                   CREATED          STATUS          PORTS     NAMES
5ffa62c2f513   prom/node-exporter:v0.17.0   "/bin/node_exporter …"   33 minutes ago   Up 33 minutes             node-exporter
50f208b3b737   ceph/daemon:latest-pacific   "/opt/ceph-container…"   34 minutes ago   Up 34 minutes             ceph-osd-4
6728621fbd6a   ceph/daemon:latest-pacific   "/opt/ceph-container…"   34 minutes ago   Up 34 minutes             ceph-osd-1
8aa31cf5484b   ceph/daemon:latest-pacific   "/opt/ceph-container…"   35 minutes ago   Up 35 minutes             ceph-mgr-node2
d9dacfa21734   ceph/daemon:latest-pacific   "/opt/ceph-container…"   37 minutes ago   Up 37 minutes             ceph-mon-node2
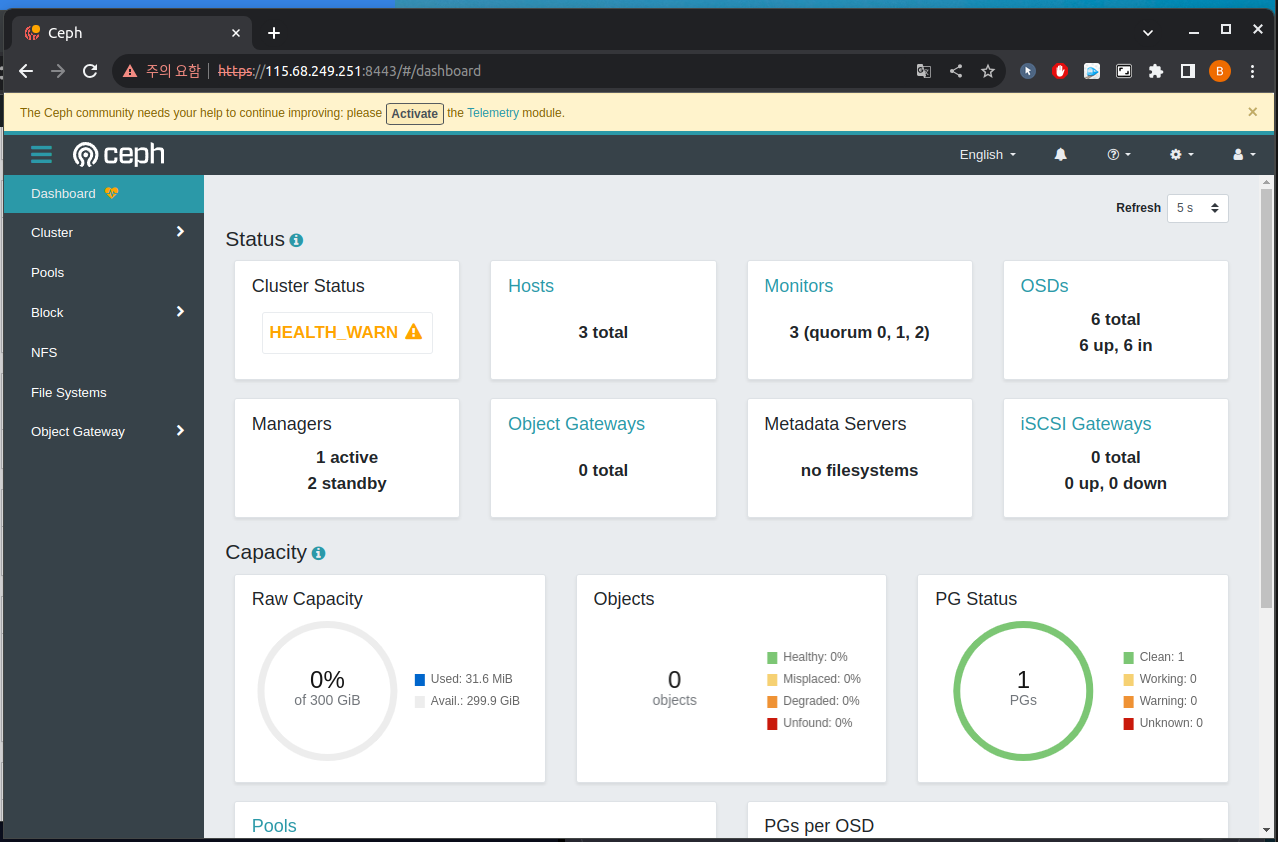
정상적으로 컨테이너 배포가 완료되었다면 컨테이너에서 ceph -s 명령어를 통하여 정상적 osd가 올라왔는지 확인할 수 있습니다.
docker exec ceph-mon-node0 ceph -s
  cluster:
    id:     467ae2d9-123d-4bba-b391-dc3258094daa
    health: HEALTH_WARN
            mons are allowing insecure global_id reclaim

  services:
    mon: 3 daemons, quorum node1,node0,node2 (age 34m)
    mgr: node0(active, since 23m), standbys: node1, node2
    osd: 6 osds: 6 up (since 32m), 6 in (since 32m)

  data:
    pools:   1 pools, 1 pgs
    objects: 0 objects, 0 B
    usage:   32 MiB used, 300 GiB / 300 GiB avail
    pgs:     1 active+clean
Dashboard
각 노드 관리를 위하여 ceph-dashboard 및 grafana 도 같이 배포되며 grafana를 배포한 서버의 8443포트 및 group_vars/all.yml에서 설정한 계정정보를 사용하여 ceph-dashboard에 접속 할 수 있습니다
배포중 직면했던 에러들…
ansible 및 ceph 의 경험이 적다보니 다사다난 했습니다. 다음에 같은 문제 발생시 찾아보기위해 적어둡니다.
배포할 노드의 디스크를 파티셔닝하여 발생했던 이슈
ansible-playbook 을 이용하여 배포 진행중 아래와 같은 에러 발생
stderr: '--> RuntimeError: Device /dev/vdb has partitions.'
노드들의 디스크 파티션을 삭제뒤 해결했습니다.
mon 노드의 keyring 을 교환할 수 없었던 이슈
TASK [ceph-mon : ceph monitor mkfs with keyring] ********************************************************
Wednesday 22 November 2023  14:27:27 +0900 (0:00:00.030)       0:01:02.642 ****
fatal: [osd1]: FAILED! => changed=true
  cmd:
  - docker
  - run
  - --rm
  - --net=host
  - -v
  - /var/lib/ceph/:/var/lib/ceph:z
  - -v
  - /etc/ceph/:/etc/ceph/:z
  - --entrypoint=ceph-mon
  - docker.io/ceph/daemon:latest-pacific
  - --cluster
  - ceph
  - --setuser
  - '167'
  - --setgroup
  - '167'
  - --mkfs
  - -i
  - osd1
  - --fsid
  - fe7f37b4-f783-4f36-8574-73c3e9c2d90e
  - --keyring
  - /var/lib/ceph/tmp/ceph.mon..keyring
  delta: '0:00:00.629752'
  end: '2023-11-22 14:27:28.673441'
  msg: non-zero return code
  rc: 1
  start: '2023-11-22 14:27:28.043689'
  stderr: |-
    /home/jenkins-build/build/workspace/ceph-build/ARCH/x86_64/AVAILABLE_ARCH/x86_64/AVAILABLE_DIST/centos8/DIST/centos8/MACHINE_SIZE/gigantic/release/16.2.5/rpm/el8/BUILD/ceph-16.2.5/src/mon/MonMap.h: In function 'void MonMap::add(const mon_info_t&)' thread 7f0537d64700 time 2023-11-22T05:27:28.459109+0000
    /home/jenkins-build/build/workspace/ceph-build/ARCH/x86_64/AVAILABLE_ARCH/x86_64/AVAILABLE_DIST/centos8/DIST/centos8/MACHINE_SIZE/gigantic/release/16.2.5/rpm/el8/BUILD/ceph-16.2.5/src/mon/MonMap.h: 221: FAILED ceph_assert(addr_mons.count(a) == 0)
     ceph version 16.2.5 (0883bdea7337b95e4b611c768c0279868462204a) pacific (stable)
     1: (ceph::__ceph_assert_fail(char const*, char const*, int, char const*)+0x158) [0x7f052eef2b24]
     2: /usr/lib64/ceph/libceph-common.so.2(+0x276d3e) [0x7f052eef2d3e]
     3: (MonMap::add(mon_info_t const&)+0x78) [0x7f052f2a5ed8]
     4: (MonMap::add(std::__cxx11::basic_string<char, std::char_traits<char>, std::allocator<char> > const&, entity_addrvec_t const&, unsigned short, unsigned short)+0x15a) [0x7f052f2a613a]
     5: (MonMap::init_with_addrs(std::vector<entity_addrvec_t, std::allocator<entity_addrvec_t> > const&, bool, std::basic_string_view<char, std::char_traits<char> >)+0x9b) [0x7f052f2a0c5b]
     6: (MonMap::init_with_ips(std::__cxx11::basic_string<char, std::char_traits<char>, std::allocator<char> > const&, bool, std::basic_string_view<char, std::char_traits<char> >)+0x94) [0x7f052f2a0ea4]
     7: (MonMap::build_initial(ceph::common::CephContext*, bool, std::ostream&)+0x676) [0x7f052f2a3226]
     8: main()
     9: __libc_start_main()
     10: _start()
    *** Caught signal (Aborted) **
     in thread 7f0537d64700 thread_name:ceph-mon
    2023-11-22T05:27:28.458+0000 7f0537d64700 -1 /home/jenkins-build/build/workspace/ceph-build/ARCH/x86_64/AVAILABLE_ARCH/x86_64/AVAILABLE_DIST/centos8/DIST/centos8/MACHINE_SIZE/gigantic/release/16.2.5/rpm/el8/BUILD/ceph-16.2.5/src/mon/MonMap.h: In function 'void MonMap::add(const mon_info_t&)' thread 7f0537d64700 time 2023-11-22T05:27:28.459109+0000
    /home/jenkins-build/build/workspace/ceph-build/ARCH/x86_64/AVAILABLE_ARCH/x86_64/AVAILABLE_DIST/centos8/DIST/centos8/MACHINE_SIZE/gigantic/release/16.2.5/rpm/el8/BUILD/ceph-16.2.5/src/mon/MonMap.h: 221: FAILED ceph_assert(addr_mons.count(a) == 0)
mon 노드의 keyring 을 교환할 수 없었던 이슈, 1차적으로 ntp 설정을 안해뒀었다. 아래처럼 all.yml에 파일에 추가
dummy:
  cluster: ceph
  ntp_service_enabled: true
  ntp_daemon_type: chronyd
허나 해결되지 않음, 확인해보니 vlan을 cluster_network 로 지정해두었으나 네트워크 인터페이스는 public_network 인터페이스로 지정된것을 확인하고 인터페이스 변경후 해결했습니다.
RETRYING: wait for all osd to be up (60 retries left)
TASK [ceph-osd : wait for all osd to be up] *************************************************************
Wednesday 22 November 2023  14:44:14 +0900 (0:00:01.942)       0:04:00.910 ****
skipping: [osd1]
FAILED - RETRYING: wait for all osd to be up (60 retries left).
FAILED - RETRYING: wait for all osd to be up (59 retries left).
FAILED - RETRYING: wait for all osd to be up (58 retries left).
FAILED - RETRYING: wait for all osd to be up (57 retries left).
FAILED - RETRYING: wait for all osd to be up (56 retries left).
FAILED - RETRYING: wait for all osd to be up (55 retries left).
FAILED - RETRYING: wait for all osd to be up (54 retries left).
FAILED - RETRYING: wait for all osd to be up (53 retries left).
FAILED - RETRYING: wait for all osd to be up (52 retries left).
FAILED - RETRYING: wait for all osd to be up (51 retries left).
FAILED - RETRYING: wait for all osd to be up (50 retries left).
FAILED - RETRYING: wait for all osd to be up (49 retries left).
FAILED - RETRYING: wait for all osd to be up (48 retries left).
FAILED - RETRYING: wait for all osd to be up (47 retries left).
FAILED - RETRYING: wait for all osd to be up (46 retries left).
FAILED - RETRYING: wait for all osd to be up (45 retries left).
FAILED - RETRYING: wait for all osd to be up (44 retries left).
FAILED - RETRYING: wait for all osd to be up (43 retries left).
FAILED - RETRYING: wait for all osd to be up (42 retries left).
FAILED - RETRYING: wait for all osd to be up (41 retries left).
FAILED - RETRYING: wait for all osd to be up (40 retries left).
FAILED - RETRYING: wait for all osd to be up (39 retries left).
FAILED - RETRYING: wait for all osd to be up (38 retries left).
FAILED - RETRYING: wait for all osd to be up (37 retries left).
FAILED - RETRYING: wait for all osd to be up (36 retries left).
FAILED - RETRYING: wait for all osd to be up (35 retries left).
FAILED - RETRYING: wait for all osd to be up (34 retries left).
FAILED - RETRYING: wait for all osd to be up (33 retries left).
FAILED - RETRYING: wait for all osd to be up (32 retries left).
FAILED - RETRYING: wait for all osd to be up (31 retries left).
FAILED - RETRYING: wait for all osd to be up (30 retries left).
FAILED - RETRYING: wait for all osd to be up (29 retries left).
FAILED - RETRYING: wait for all osd to be up (28 retries left).
FAILED - RETRYING: wait for all osd to be up (27 retries left).
FAILED - RETRYING: wait for all osd to be up (26 retries left).
FAILED - RETRYING: wait for all osd to be up (25 retries left).
FAILED - RETRYING: wait for all osd to be up (24 retries left).
FAILED - RETRYING: wait for all osd to be up (23 retries left).
FAILED - RETRYING: wait for all osd to be up (22 retries left).
FAILED - RETRYING: wait for all osd to be up (21 retries left).
FAILED - RETRYING: wait for all osd to be up (20 retries left).
FAILED - RETRYING: wait for all osd to be up (19 retries left).
FAILED - RETRYING: wait for all osd to be up (18 retries left).
FAILED - RETRYING: wait for all osd to be up (17 retries left).
FAILED - RETRYING: wait for all osd to be up (16 retries left).
FAILED - RETRYING: wait for all osd to be up (15 retries left).
FAILED - RETRYING: wait for all osd to be up (14 retries left).
FAILED - RETRYING: wait for all osd to be up (13 retries left).
FAILED - RETRYING: wait for all osd to be up (12 retries left).
FAILED - RETRYING: wait for all osd to be up (11 retries left).
FAILED - RETRYING: wait for all osd to be up (10 retries left).
FAILED - RETRYING: wait for all osd to be up (9 retries left).
FAILED - RETRYING: wait for all osd to be up (8 retries left).
FAILED - RETRYING: wait for all osd to be up (7 retries left).
FAILED - RETRYING: wait for all osd to be up (6 retries left).
FAILED - RETRYING: wait for all osd to be up (5 retries left).
FAILED - RETRYING: wait for all osd to be up (4 retries left).
FAILED - RETRYING: wait for all osd to be up (3 retries left).
FAILED - RETRYING: wait for all osd to be up (2 retries left).
FAILED - RETRYING: wait for all osd to be up (1 retries left).
fatal: [osd2 -> osd1]: FAILED! => changed=false
  attempts: 60
  cmd:
  - docker
  - exec
  - ceph-mon-osd1
  - ceph
  - --cluster
  - ceph
  - osd
  - stat
  - -f
  - json
  delta: '0:00:00.352410'
  end: '2023-11-22 14:54:43.851913'
  msg: ''
  rc: 0
  start: '2023-11-22 14:54:43.499503'
  stderr: ''
  stderr_lines: <omitted>
  stdout: |2-

    {"epoch":8,"num_osds":2,"num_up_osds":0,"osd_up_since":0,"num_in_osds":1,"osd_in_since":1700632444,"num_remapped_pgs":0}
  stdout_lines: <omitted>
배포의 마지막부분에서 osd 컨테이너를 가동하면서 failover 테스트를 진행하는듯 합니다 허나 노드에서 컨테이너를 확인하였을때 수초 올라왔다가 떨어지기를 반복하고 설치가 종료되었습니다.
이부분도 네트워크 인터페이스 이슈였으며, 네트워크를 인터페이스를 cluster_network 로 지정해두니 해결되었습니다.
보통 하드웨어 리소스가 부족하거나, network 가 불안정할때 발생한다고 합니다.
ansible-playbook 구문 에러
[DEPRECATION WARNING]: [defaults]callback_whitelist option, normalizing names to new standard, use
callbacks_enabled instead. This feature will be removed from ansible-core in version 2.15. Deprecation
warnings can be disabled by setting deprecation_warnings=False in ansible.cfg.
[DEPRECATION WARNING]: "include" is deprecated, use include_tasks/import_tasks instead. This feature
will be removed in version 2.16. Deprecation warnings can be disabled by setting
deprecation_warnings=False in ansible.cfg.
ERROR! couldn't resolve module/action 'openstack.config_template.config_template'. This often indicates a misspelling, missing collection, or incorrect module path.

The error appears to be in '/root/ceph-ansible/roles/ceph-config/tasks/main.yml': line 138, column 3, but may
be elsewhere in the file depending on the exact syntax problem.

The offending line appears to be:


- name: "generate {{ cluster }}.conf configuration file"
  ^ here
We could be wrong, but this one looks like it might be an issue with
missing quotes. Always quote template expression brackets when they
start a value. For instance:

    with_items:
      - {{ foo }}

Should be written as:

    with_items:
      - "{{ foo }}"
ansible.posix 가 설치하려는 버전에 맞게 설치되어 있지 않아서 발생했던 이슈, pip3 install ansible.posix를 통해 설치 (requirement.txt 에도 있음)
또는 git brach의 버전과 배포하려는 ceph 의 버전 그리고 ansible 버전이 맞지 않아도 위와같이 구문 오류가 발생
어떤버전을 사용하고있는지 한번더 확인후 서로 맞춰준뒤 해결되었습니다.
fsid error
해당 로그를 삭제해서 가지고있지는 않지만 에러내용은 배포중 fsid 를 가져오는데 매우 긴시간 대기하다가. 위에서 발생한 keyring 에러로 다시 순환하는 현상이 있었습니다.
배포한 노드들을 모두 초기화하고, keyring error부분에서 설명했던 네트워크 인터페이스를 재정의하니 해결되었습니다.
grafana user id/password 를 설정하는 task 에서 에러
TASK [ceph-dashboard : inject grafana dashboard layouts] ************************************************
Thursday 23 November 2023  10:07:28 +0900 (0:00:00.582)       0:05:18.086 *****
fatal: [node1 -> node0]: FAILED! => changed=false
  cmd:
  - docker
  - exec
  - ceph-mon-node0
  - ceph
  - --cluster
  - ceph
  - dashboard
  - grafana
  - dashboards
  - update
  delta: '0:00:00.431005'
  end: '2023-11-23 10:07:29.118231'
  msg: non-zero return code
  rc: 22
  start: '2023-11-23 10:07:28.687226'
  stderr: |-
    Error EINVAL: Traceback (most recent call last):
      File "/usr/share/ceph/mgr/mgr_module.py", line 1348, in _handle_command
        return self.handle_command(inbuf, cmd)
      File "/usr/share/ceph/mgr/dashboard/module.py", line 418, in handle_command
        push_local_dashboards()
      File "/usr/share/ceph/mgr/dashboard/grafana.py", line 136, in push_local_dashboards
        retry()
      File "/usr/share/ceph/mgr/dashboard/grafana.py", line 93, in __call__
        result = self.func(*self.args, **self.kwargs)
      File "/usr/share/ceph/mgr/dashboard/grafana.py", line 131, in push
        grafana.push_dashboard(body)
      File "/usr/share/ceph/mgr/dashboard/grafana.py", line 58, in push_dashboard
        response.raise_for_status()
      File "/lib/python3.6/site-packages/requests/models.py", line 940, in raise_for_status
        raise HTTPError(http_error_msg, response=self)
    requests.exceptions.HTTPError: 401 Client Error: Unauthorized for url: https://10.101.0.14:3000/api/dashboards/db
  stderr_lines: <omitted>
  stdout: ''
  stdout_lines: <omitted>
아직 해결하지 못했습니다. 혹여나 443포트를 사용하면서 인증서 에러가 발생한걸까 싶었지만, 인증서를 사용하지 않아도 발생하고..
구글링을 한참해보니 비슷한 문제에 직면한 분이 계셔서 stable-6.0 버전의 버그인듯 하지만 조금 찝찝하네요.
https://github.com/ceph/ceph-ansible/issues/5491